Undervolting & “un-throttling” the Intel Atom Z3xxx Bay Trail CPU series (e.g. ThinkPad 8)

TL;DR: Support for Atom Z3000 series in ThrottleStop is amazing. At full load the temperatures of my ThinkPad 8 are 6-8°C lower, 1.5W less power draw, always-on Turbo Mode.

It recently came to my attention that ThrottleStop, a utility I had been using previously to undervolt my Fujitsu U2010 (Intel Atom Z530), is now finally available with support for the Intel Atom Z3xxx Bay Trail CPU series (used in Lenovo ThinkPad 8, ThinkPad 10, Dell Venue 8 Pro, Asus VivoTab etc.).
The Lenovo ThinkPad 8, while being a good performing mobile warrior device, is not known for being cool and conserving in terms of battery usage. The Intel Atom Z3795 CPU gets quite hot when under load. Lenovo’s thermal management includes heavy throttling/down-clocking of the CPU to stay within the bounds of TJmax of 105°C of this CPU. While the Lenovo Settings tool offer a hard to find/enable “Cool Mode”, it doesn’t do much to lower the temperature and battery consumption.

Naturally I was eager to test ThrottleStop on this device, knowing it was able to lower the voltage (Voltage ID/VID) of the Z530 CPU on my Fujitsu U2010, thus reducing the overall power draw + TDP of the CPU.

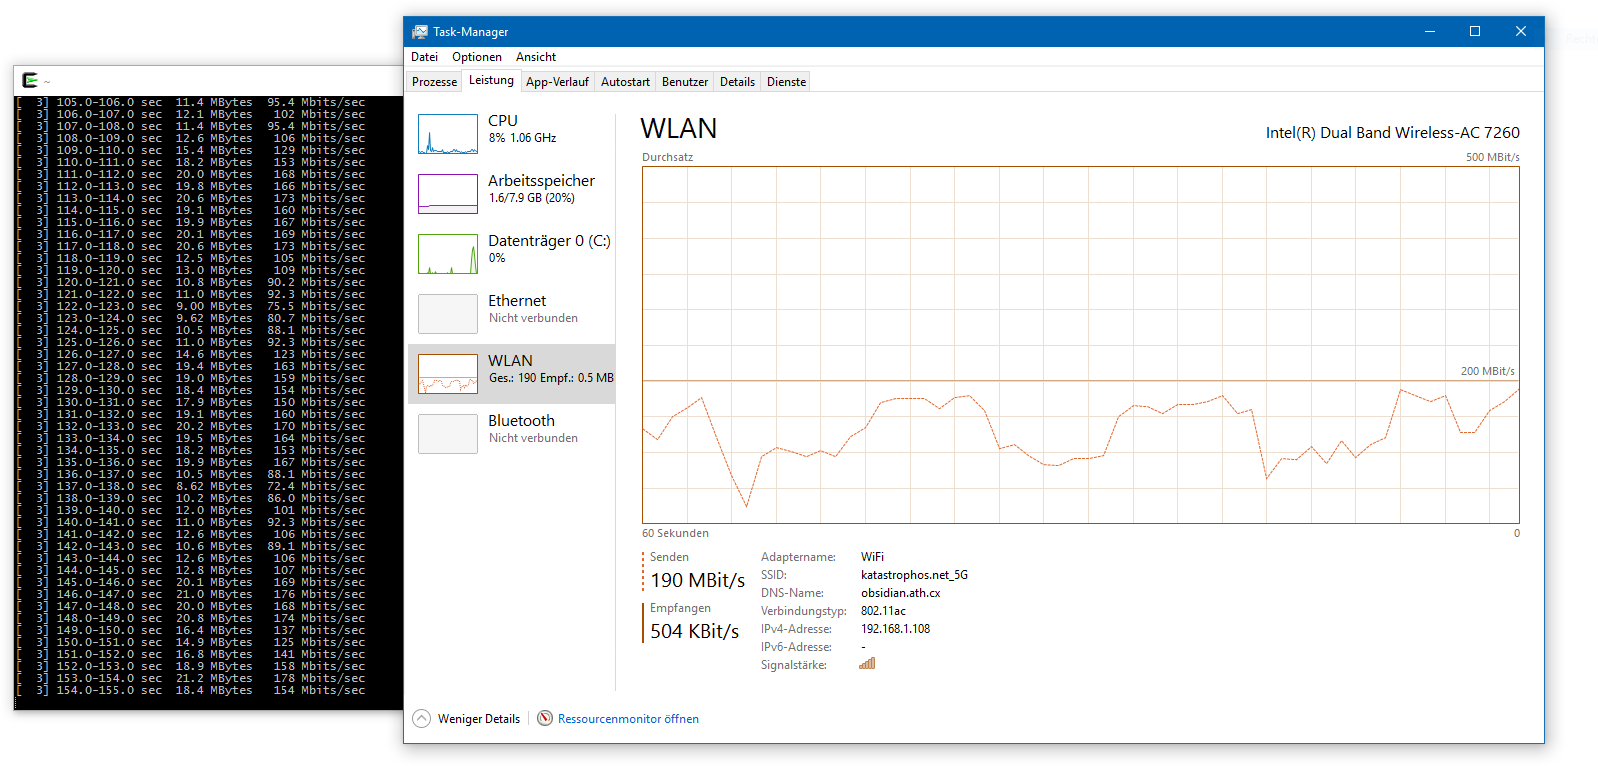
First off, here are the results running prime95 (64-bit, Torture mode, Small FFT, max. CPU heat/usage) with the stock clocking and CPU management. Running at a max. Turbo Mode VoltageID/VID of 0.63 V:

Without ThrottleStop, max. Turbo Mode VoltageID/VID of 0.63 V

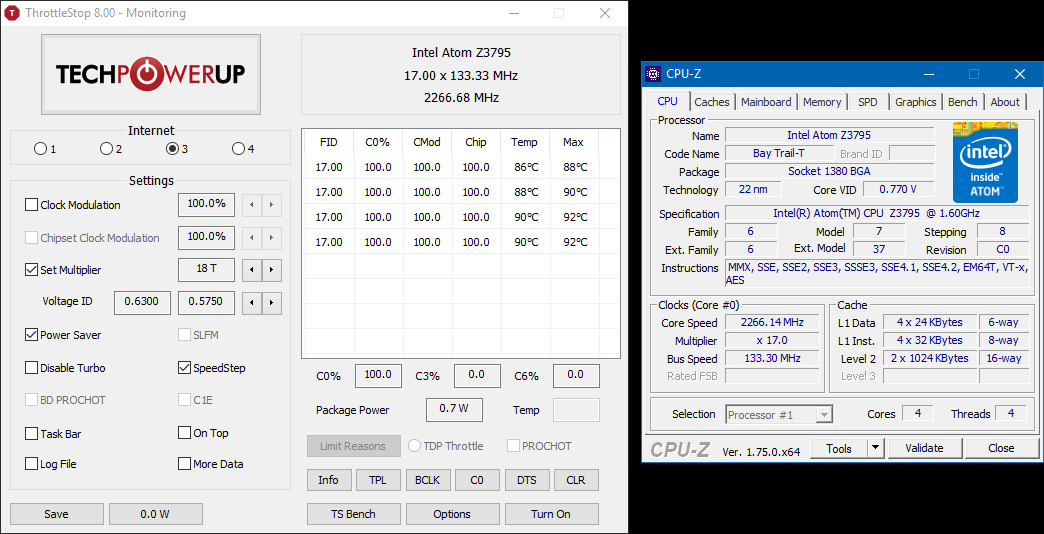
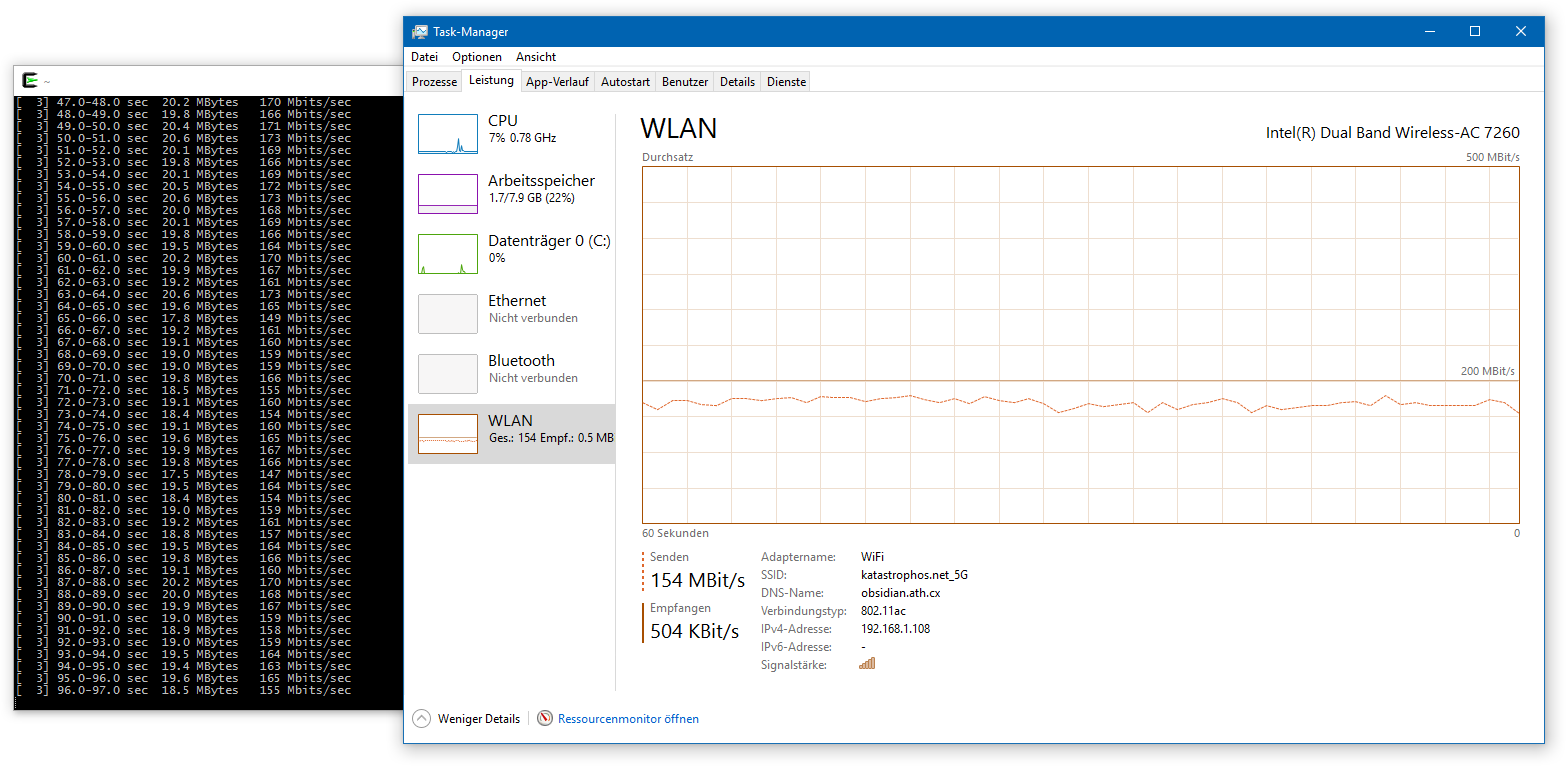
Now with ThrottleStop enabled, max. Turbo Mode VID set to 0.575 V (0.055 V lower), which I found to be stable on my device:

With ThrottleStop enabled, max. Turbo Mode VID set to 0.575 V (0.055 V lower)

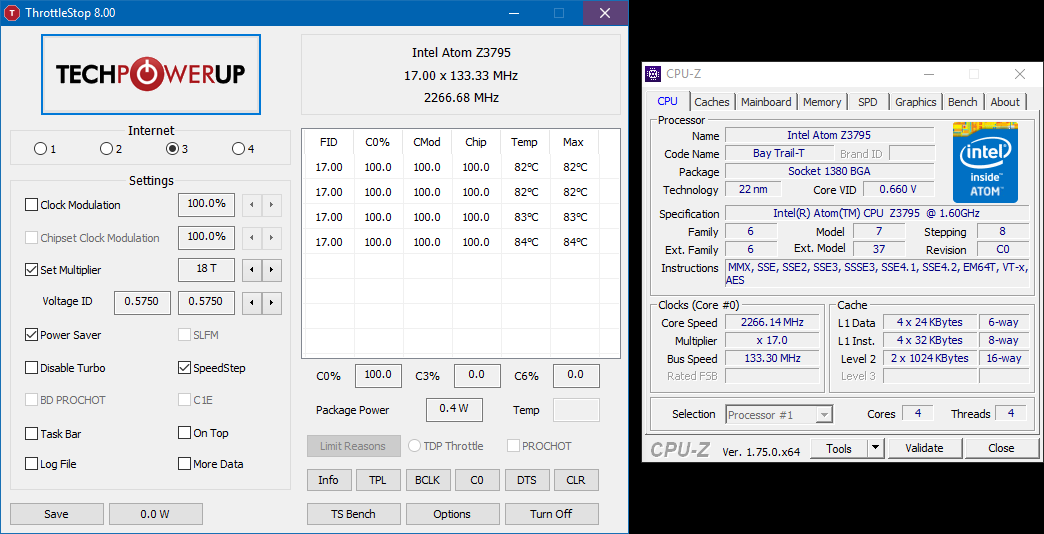
As you can see temperatures are 6-8°C lower with ThrottleStop enabled – and that is with Turbo Mode constantly on! There is no throttling happening like with the stock CPU management. Battery draw on load is roughly 1.5 Watts lower: 7.3W versus 8.8W
These 6-8°C difference + constant Turbo Mode are especially great for playing occasional games on the device as there is more thermal headroom for the IGP to use, i.e. a lot less lagging + stuttering inherent to Lenovo’s stock thermal management.

If you want to give it a spin, ThrottleStop can be downloaded here.
Make sure to create a backup of your device first, since playing with the VID is what system tweakers call a “suicide run”, i.e. it will lock up/crash your system if you lower it too much. You might just lose data. As always with these types of tweaks: your mileage may vary, here be dragons, warranty void.

Windows 10 TH2 Wifi/WLAN AutoConfig scan bug

Ever since upgrading my two Windows machines (Asus UX301 ultrabook and Lenovo ThinkPad 8 tablet) to Windows 10 the Wifi throughput and latencies have been a mixed bag. Throughput is fluctuating and latency skyrocketing to 100ms periodically every 10-30 seconds. The bug is pretty similar to the one in Windows 7 ages ago where the operating system would continue scanning for available networks every few seconds, thus interfering with the current Wifi connection. The issue looks like this (iperf measurement + Task Manager graph for Wifi connection):

W10WifiScanBugBefore

The drop in throughput is also where the latency is increasing to a point where VNC and even SSH connections are no longer interactive.

After tuning my access point’s and Wifi adapters’ settings to no avail, I started looking for running services on Windows 10 that might cause these interferences and lo and behold restarting the service “WlanSvc” (WLAN Auto Config) fixed the issue. I am now employing a task that does this on startup of the machine.

W10WifiScanBugAfter

Alternatively you can manually enable/disable WLAN autoconfig on all interfaces. This can be used during and after connecting to the Wifi network:

netsh wlan set autoconfig enable=no interface=*

to disable autoconfig after making the connection.

netsh wlan set autoconfig enable=yes interface=*

to connect to other wireless LANs again afterwards.

Microsoft, get your crap sorted out!

Running the SailfishOS Build engine outside of a VirtualBox VM

I have been struggling with the SailfishOS Build Engine VM for quite some time. 4 out of 5 SailfishOS builds of QuasarMX would fail because the Shared Folder (vboxsf) mechanism in VirtualBox at some point starts to corrupt files on my system, even though the system’s RAM and storage are perfectly fine. Since QuasarMX heavily relies on qmlpp (see previous post) to work with QtQuick 2, a lot of files will be touched during compilation. For this, vboxsf is both unreliable and slow (!).

So, here is a short tutorial that will show how to run the SailfishOS Build engine outside of the VirtualBox VM in your host’s Linux installation. This guide is geared towards Ubuntu 12.04, but might work on other systems too.

UPDATE 1: New version with root check, private namespace and permission fixes in SB2 targets.
UPDATE 2: The tutorial has been updated to work with SDK Alpha-1404 (Alpha 4). This new version does not work with Alpha-1312 (Alpha 3).
UPDATE 3: This method is working with SDK Beta-1509.

Start the Build engine VM and make sure you can connect to it via SSH (see Developer FAQ for details):
$SUDO_USER is the username you used to sudo into root privileges, change it if you have not used sudo to become root.

ssh -p 2222 -i /home/$SUDO_USER/SailfishOS/vmshare/ssh/private_keys/engine/root root@localhost

If it works:

exit

Now, become root:

sudo -i

Create a directory to host the rootfs of the SailfishOS Build engine:

mkdir /opt/sailfishos-buildengine

Use rsync to copy the rootfs to our newly created directory:

rsync --numeric-ids -xazuv -e "ssh -p 2222 -i /home/$SUDO_USER/SailfishOS/vmshare/ssh/private_keys/engine/root" root@localhost:/ /opt/sailfishos-buildengine

This will take a while. Go, have dinner or get a cup of tea.

Save the following script as file “run-sailfishos-buildengine.sh” somewhere you like. We’ll use /opt/run-sailfishos-buildengine.sh
Make sure to edit the first few lines to match your environment, SDK=/opt/SailfishOS is the directory you used to install the Sailfish SDK on your host. This probably is /home/YOURUSERNAME/SailfishOS if you haven’t installed as root.

#!/bin/bash
USER=$SUDO_USER
USERDIR=/home/$USER
SDK=/opt/SailfishOS
BUILDENGINE=/opt/sailfishos-buildengine

if [ $EUID -ne 0 ]; then
	echo "This script must be run as root." 1>&2
	exit 1
fi

if cmp -s /proc/$PPID/mountinfo /proc/self/mountinfo; then
	exec unshare -m -- "$0" "$@"
	echo "$0 must be run in private namespace."
	exit 1
fi
		
cleanup()
{
	umount -l $BUILDENGINE/dev/pts
	umount -l $BUILDENGINE/dev
	umount -l $BUILDENGINE/proc
	umount -l $BUILDENGINE/sys
	umount -l $BUILDENGINE/run

	umount -l $BUILDENGINE/home/mersdk/share	
	umount -l $BUILDENGINE/home/src1
	umount -l $BUILDENGINE/etc/ssh/authorized_keys
	umount -l $BUILDENGINE/host_targets
	umount -l $BUILDENGINE/etc/mersdk/share
}

trap "cleanup > /dev/null 2>&1; exit" INT QUIT TERM EXIT

mount --make-slave "$(df -P "$BUILDENGINE" | tail -1 | awk '{print $NF}')"

mount --bind /dev "$BUILDENGINE/dev"
mount --bind /dev/pts "$BUILDENGINE/dev/pts"
mount --bind /proc "$BUILDENGINE/proc"
mount --bind /sys "$BUILDENGINE/sys"
mount --bind /run "$BUILDENGINE/run"

mount --bind "$USERDIR" "$BUILDENGINE/home/mersdk/share"
mount --bind "$USERDIR" "$BUILDENGINE/home/src1"
mount --bind "$SDK/mersdk/ssh" "$BUILDENGINE/etc/ssh/authorized_keys"
mount --bind "$SDK/mersdk/targets" "$BUILDENGINE/host_targets"
mount --bind "$SDK/vmshare" "$BUILDENGINE/etc/mersdk/share"

# Rewrite user id and group id entries to match host system's users
updateConfigs()
{
	sed -i -e "s/$1:x:$2:100000:/$1:x:$(id -u $USER):$(id -g $USER):/" "$3/passwd"
	sed -i -e "s/$1:x:100000:/$1:x:$(id -g $USER):/" "$3/group"
	cp /etc/resolv.conf "$3/"
}

updateConfigs mersdk 1001 "$BUILDENGINE/etc"
updateConfigs nemo 100000 "$BUILDENGINE/srv/mer/targets/SailfishOS-armv7hl/etc"
updateConfigs nemo 100000 "$BUILDENGINE/srv/mer/targets/SailfishOS-i486/etc"

cat > "$BUILDENGINE/runmersdkengine.sh" << CONTENT
#!/bin/bash

cleanup()
{
	pkill -KILL -f "/usr/bin/ruby /usr/bin/puma -p 8080 -t 1:1 -e production"
}
trap "cleanup; exit" INT QUIT TERM EXIT

# Fix up permissions to point to new uid/gid of mersdk
mkdir -p /home/deploy/installroot
chown -R mersdk.mersdk /home/deploy/installroot
chown -R mersdk.mersdk /srv/mer/targets/*
find /home/mersdk | grep -v "/home/mersdk/share" | xargs chown mersdk.mersdk

# Run web server of build engine as mersdk in background:
su mersdk -c "cd /usr/lib/sdk-webapp-bundle; /usr/bin/ruby /usr/bin/puma -p 8080 -t 1:1 -e production" &

# Run SSH Server of build engine as root:
/usr/sbin/sshd -p 2222 -D -e -f /etc/ssh/sshd_config_engine
CONTENT

chroot "$BUILDENGINE" sh /runmersdkengine.sh 

Don’t forget to

chmod 755 /opt/run-sailfishos-buildengine.sh

Now exit the root shell and run:

sudo /opt/run-sailfishos-buildengine.sh

This will start the Open SSH server and the build engine’s web server which is used in the modified Qt Creator of the SailfishOS SDK.
Press CTRL+C to terminate the engine at any time.

Qt Creator will complain that the VM is not started and offers to start the VM for you. Just click No and ignore it. The build is already running in the background.

Enjoy your fast builds!

A QtQuick / QML preprocessor, the Q’n’D and KISS way

Lately, I have been porting the existing code base of QuasarMX to Qt 5. While the C++ core was migrated in almost zero time, porting the QtQuick 1 code to QtQuick 2 was not as straight forward. In a small experiment I decided to change “import QtQuick 1.1” to “import QtQuick 2.1” in all of the 600 files, to see how far that gets me. To my amusement it actually worked for almost all files. I only had to make some QtQuick 2 specific changes due to changed behavior in the new engine.
I hate to duplicate my code bases, especially if I still have to support platforms that only support Qt 4.7+ and QtQuick 1. It puzzles me how there is no preprocessor / macro functionality available in QML, especially if – like in my case – 99% of the QtQuick 1 code runs on QtQuick 2 without any modification other than changing the import section. Talk about detachment from reality…

So, here is a very quick-and-dirty preprocessor that will rewrite the import section and also apply line changes based on defines. It is inspired by the very simplistic notation of the preprocessor used in Octatask (paper), but the implementation is new. The preprocessor does not change the line count of the preprocessed files (read: debuggable) and preprocessing is reversible as no information is lost (read: unused lines are commented).

It is available here:
https://svn.katastrophos.net/kcl/trunk/qmlpp/ (yes, that is a Subversion repository)

The preprocessor is contained in the sub-folder “src”. It is comprised of the qmlpp.pri file for easy inclusion in your .pro file and qmlpp.sh, which is the Bash script doing the fancy substitution work (read: sed running humongous regexps). If you are using this on Windows, make sure to install Cygwin and put the location of bash.exe into your system’s PATH variable.

The sub-folder “test” contains an example project, that will compile and work on both Qt 4 / QtQuick 1 and Qt 5 / QtQuick 2. Check it out to get a feeling what you need to change to make your code work on both versions of the toolkit.

In your application’s .pro file you basically add the following code:

include(qmlpp/src/qmlpp.pri)

target_qtquick1: qmlPreprocessFolder(yourQmlDirectoryHere, @QtQuick1, 1.0)
target_qtquick2: qmlPreprocessFolder(yourQmlDirectoryHere, @QtQuick2, 2.0)

The exported function is defined as:

qmlPreprocessFolder(folders, defines, rewriteVersion)
  • folders: One or more folders relative to the $$PWD, separated by space. Example: qml js
  • defines: One or more defines to set, separated by space. Defines always start with @. Example: @QtQuick2 @Android
  • rewriteVersion: This defines the version to rewrite the line “import QtQuick x.y” to. Example: 2.1

In your code you can now set the defines as marker comments in the style of //@DEFINENAME:

@QtQuick1 define set:

     someFunctionSpecificToQtQuick1(); //@QtQuick1
     //someFunctionSpecificToQtQuick2(); //@QtQuick2

@QtQuick2 define set:

     //someFunctionSpecificToQtQuick1(); //@QtQuick1
     someFunctionSpecificToQtQuick2(); //@QtQuick2

This works for both .qml and .js files.

You can also stop the preprocessor from rewriting the line containing “import QtQuick” by adding the “//!noRewrite” marker comment to it:

import QtQuick 1.1 //@QtQuick1 //!noRewrite
//import QtQuick 2.0 //@QtQuick2 //!noRewrite

This is useful in those situations where you need more fine-grained control of the rewrite process.

Once you run qmake again, the QML preprocessor will rewrite your files. Make sure to save any pending changes before. I am working on a more generic and safe method of including the preprocessor to possibly rewrite the files during deployment-time or run-time.

The tool is also available via command line. This is useful for when you are rolling your own deployment scripts or if you are using CMake.

usage: ./qmlpp.sh [options] <filename JS or QML or directoryname>

OPTIONS:
   -h                Show this message.
   -q <major.minor>  The version of QtQuick to rewrite to. Example: -q 2.1
   -d <defines>      The defines to set, separated by |. Example: -d "@QtQuick1|@Meego|@Debug"
   -i                Modify file in-place instead of dumping to stdout.

Oh Nokia…

So, Nokia is removing developer documentation and support from their site to focus on the ill-fated move to Lumia Windows Phones and their S40 devices re-branded as Asha.

The first victim (or shall I say winner?) of this move has been Qt. Best move ever selling Qt to Digia, Nokia! Now we can finally have official iPhone and Android support in Qt. Digia has been committed to developing Qt ever since and in my opinion it finally shows.
The second victim is Symbian of course. Nokia is incrementally removing support for the platform. Most of the online developer resources have vanished and it is getting harder to find documentation.
The third victim is obviously Harmattan / Maemo 6 which is used on the N9 and N950. The harmattan-dev.nokia.com site has been offline for the last 2 to 3 weeks and I have repeatedly called upon @nokiadeveloper on Twitter to get the issue sorted out. It looks like there is absolutely no interest on Nokia’s side, which is quite unfortunate.

This is Nokia kicking developers in the teeth. Thank you.

So, as matters stand now I have created three mirrors on katastrophos.net to keep all those valuable Harmattan and Symbian resources alive:

Symbian Belle Developer Libary: http://symbian-dev.katastrophos.net
Harmattan Developer Documentation: http://harmattan-dev.katastrophos.net
Symbian Resources, Development Tools & SDKs: https://katastrophos.net/symbian/mirrors

Nokia, yes, if you have problems with yours truly mirroring your abandoned content, sue me.
Oh, and by the way, you are still owing me 600 Euros for January! 3 eMails and 2 months of patience and NOTHING has been resolved.

Installing Ubuntu 12.04 (Precise Pangolin) on Fujitsu U820, U2010, U2020

Ubuntu 12.04 has been released almost a month ago and I thought I revive my semi-benched U2010 to see how the hardware support has improved in this new release of Ubuntu.

First off, if you are installing Ubuntu 12.04 and are getting the dreaded black screen issue, follow the Ubuntu Wiki here. Make sure to also install the fix to get suspend/sleep and hibernate working with the new psb_gfx driver.
After the installation you will have to make some minor adjustments to get everything working on the Fujitsu U820/U2010:

/etc/modprobe.d/blacklist.conf

blacklist poulsbo
blacklist fujitsu_laptop

The first line disables the stub driver, the second line makes sure you can actually use the backlight keys (fujitsu_laptop conflicts with the psb_gfx driver).
The enable_msi fix in /etc/modprobe.d/alsa-base.conf is no longer required. The sound will work just fine without it.

To get the microphone working I had to add the following line in /etc/modprobe.d/alsa-base.conf:

options snd-hda-intel model=laptop-amic probe_mask=1

The headphone jack sensing/detection is flacky in this new release. Switching between the headphone jack and the internal speaker will only work after the audio card goes into power-saving mode, ie. a few seconds after the last audio output closed.

/etc/default/grub:

GRUB_CMDLINE_LINUX_DEFAULT="quiet console=tty1 acpi_osi=Linux acpi_backlight=vendor nmi_watchdog=0"

quiet console=tty1 is the recommended workaround for the black screen issue of the new psb_gfx driver in 12.04.
acpi_osi=Linux acpi_backlight=vendor is required to get the backlight controls working.
nmi_watchdog=0 disables the NMI watchdog responsible for detecting a hung system and might issue a reboot. According to Intel PowerTOP this option saves power by producing less wake-ups.

Finally update the bootloader via:

sudo update-grub

2. Installing the Fujitsu Buttons driver (fjbtndrv)

In order to get the screen buttons working we will need to compile and install the latest version of fjbtndrv.
The most current version as of this writing is 2.3.2. Please make sure you download the latest version here.

sudo apt-get install libxrandr-dev libxtst-dev libxi-dev libhal-dev
tar xvzf fjbtndrv-2.3.2.tar.gz
cd fjbtndrv-2.3.2
./configure
make
sudo make install

3. Calibrating the display

The touch screen has been supported for several kernel and Ubuntu versions already. The big problem always was the missing calibration tool. Luckily a calibration is now available in form of xinput-calibrator. At last special drivers are no longer required.

sudo apt-get install xinput-calibrator
sudo mkdir -p /etc/X11/xorg.conf.d
xinput_calibrator

Calibrate the display and save the output to /etc/X11/xorg.conf.d/99-calibration.conf
Here is my calibration config:

Section "InputClass"
        Identifier      "calibration"
        MatchProduct    "Fujitsu Component USB Touch Panel"
        Option  "Calibration"   "58 3877 249 3830"
EndSection

Known problems:

  • Headphone jack detection does not work as expected
  • System freezes when idling, but wakes up again once an interrupt is triggered (e.g. keyboard, mouse, touchscreen etc.). This mostly happens when I am simultaneously using a Bluetooth mouse or a Bluetooth Dialup connection. I have not been able to pin-point or fix the issue yet.
  • Screen rotation is not working with the psb_gfx driver
  • Note to self: Newer versions of the psb_gfx driver are called gma500_gfx

QuasarMX, Qt, QML and the experiments

Some of you following my micro-blogging on Twitter might already know about it: In the last few months I have been busy developing a new application. What initially just started out as a re-write of the user interface of Quasar Media Player has turned into a completely new application called QuasarMX. It is based on the very core of Quasar Media Player but stripped of all the legacy and third-party code. The completely new UI is based on Qt Quick / QML, a new technology which simplicity and elegance I fell in love with over the past year. For me QuasarMX also marks the start of two experiments:

1. How many platforms and operating systems can I port my app to?
2. Is there any commercial viability at all in publishing the software to various app stores (Nokia Ovi store, Android Market etc.) ?

The first experiment is important to me. Now that Nokia put the Qt project into open governance, the Qt community has the unique opportunity to extend primary platform support to Android, iOS and possibly even Windows Phone 7, thus extending the possible market cap and audience for mobile apps based on Qt dramatically. This experiment is largely about experiencing first hand what changes are required to get my application running on these platforms and as a matter of fact what needs to be done in projects like Necessitas (Qt on Android) to make that goal happen.

As for the second experiment I am actually just interested in getting to know the mechanics of the various app stores. I am pretty confident that there is little to no money to be made from yet another music player app. Yet, it is still interesting to see what happens, what works and what not, especially in regards to future apps.

In July Nokia accepted my application and invited me into the Qt Ambassador program. As part of this program Nokia loaned a N950 developer device to me, which I extensively used to develop and test the Harmattan UI for QuasarMX. The new user interface is very much inspired by the simplicity of the MeeGo Harmattan Swipe UI.

As of yesterday the open Beta 1 of QuasarMX is available for the Nokia N9 and N950. Releases for other platforms will follow shortly.

FHEM module for ELV ESA1000 (WZ/Z/GAS) series of devices

FHEM, the amazing home-automation server software, already has support for several sensors, meters and switches produced by ELV. In October 2010 I bought two meters, ESA1000WZ and ESA1000GAS for my house in the hope that FHEM would support them. Unfortunately it did not (at the time). I quickly found some hints that somebody, namely Gerd K., was working on adding support. So I contacted him and a day later received his module for testing. In the meantime eager in anticipation I was hacking away, duplicating the existing EM1000 extension and customizing it to read the raw strings coming from my Busware.de CUL 868 MHz USB adapter. While I got the power meter’s values (ESA1000WZ) figured out pretty quickly, it was a bit more involving to get correct readings from the gas meter (ESA1000GAS). Unfortunately Gerd’s code did not include support for the gas meter, so I emailed him my changes, but sadly never received feedback.
So today I am releasing my code on a works-for-me basis:

Download

UPDATE:Patch for FHEM 5.3 Version: Feb 10th 2013 for FHEM 5.3
Package for FHEM 5.0 Version: Oct 25th 2010 for FHEM 5.0

  • Supports ESA1000WZ power meter (infrared version, possibly others as well)
  • Supports ESA1000Z and ESA1000GAS gas meters (infrared version and version using impulse transducer for the Elster-Kromschroeder BK-G4)
  • Features proper graph files to plot current and cumulated day/month consumption

Photos / Screenshots

Installation

If you are using FHEM 5.3, please download the tar-ball version (or SVN version for that matter) and directly apply the patch cul_esa-for-fhem-5.3.patch.

UPDATE 2: Here is a completely patched version based on the tar-ball version of FHEM 5.3: fhem-5.3-cul_esa.tar.gz Version: Feb 10th 2013

If you are using FHEM 5.0:
Copy 19_CUL_ESA.pm and all .gplot files to your FHEM directories.
Sadly adding autocreate support and extending the CUL module to understand the raw message strings requires patching. Check cul_esa-for-fhem-5.0.patch to patch the files. This was diffed against the Debian package of FHEM 5.0. The very same version of FHEM as tar.gz has some differences in the sourcecode and some files missing. I contacted the author of FHEM about this issue but he has not updated the packages yet. So if you run into issues here it is probably due to these differences.

UPDATE 1: Here is a completely patched version based on the Debian package of FHEM 5.0: fhem-5.0-cul_esa.tar.gz Version: Oct 25th 2010

Here are some notes in German I made while developing the module, mostly concerning the different behavior of the ESA1000GAS compared to the ESA1000WZ:

Der ESA1000GAS mit dem ESA1000Z-Messgerät verhält sich leider anders als das ESA1000WZ, sodaß ich wieder die Korrektur-Faktoren einbinden mußte.
Ich konnte nicht herausfinden, wozu der übermittelte Tick beim ESA1000Z dient. Zwar ändert sich dieser mit geänderter Zählerkonstante, allerdings ergibt der Wert im Zusammenhang mit den von der Einheit übermittelten Werten keinen Sinn, sodaß ich hier direkt mit der Zählerkonstante multipliziere, um die Kubikmeter zu erhalten, und dann zusätzlich noch mit dem Umrechnungsfaktor (bei der EWE ergibt sich dieser aus der Zustandszahl * Brennwert Hs) multipliziere, um die Kilowattstunden aus der Gasmenge zu erhalten.
Leider ändern sich damit die Parameter bei der Definition:

Stromzähler:
define CUL_ESA_286 CUL_ESA 1925 286 1 1 23.086
also:
corr1 = corr2 = 1 (und damit wirkungslos)
CostPerUnit = 23.086 Cent/kWh

Gaszähler:
define CUL_ESA_798 CUL_ESA 1429 798 0.001 9.5154 4.5339
also:
corr1 = 0.001
corr2 = 9.5154 kWh/m3
CostPerUnit = 4.5339 Cent/kWh

Ich habe ebenfalls noch einen Durchschnittswert in Kilowatt implementiert, sodaß man die Durchschnittleistung einigermaßen sinnvoll in einem Diagramm darstellen kann. Hier gab es allerdings bei meinem Drehstromzähler Probleme mit Unterabtastung, weil sich die Drehscheibe bei geringem Verbrauch zu langsam dreht, sodaß das Meßgerät zwischendurch schon Nullwerte zurückmeldet, weil kein Impuls eingegangen ist. Dafür habe ich einen entsprechenden Schwellenwert bei der Berechnung des Durchschnittswertes implementiert. Nicht schön, funktioniert aber für meine Zwecke.

Upgrading the Fujitsu U2010 with a new 120GB SSD

Lately my Fujitsu U2010 was running low on disk space. Having already maxed out the SD card slot with a 32 GB SD card, the only way to go was to replace the internal ZIF-PATA drive. The first generation 64 GB Samsung SSD that I moved from my previous U810 to the new U2010 (see here) is no speed demon but a very reliable and robust performer featuring SLC flash memory. Naturally, I was looking for a faster, bigger and cheaper replacement drive. There are some more 1.8″ 128 GB ZIF drives available, most of them are MLC-based drives well over the 300 Euro price range. I came across a pretty cheap drive produced by a company called Mach Xtreme Technology, a newcomer in the storage segment. The MX-NANO ZIF 120 GB model (MXSSD1MNANOZ-120G) is available here in Germany at several online retailers priced at around 200 Euros. Not cheap compared to a speedy SATA SSD drive, but inexpensive in terms of how uncommon and rare this form factor is. And of course the drive is way cheaper than what I paid for the first-gen Samsung SSD back in 2008. :)
The Eastwho EWS720A controller used in the drive seems to be a solid performer with very good performance figures for what is possible in terms of the old PATA interface. The drive uses 25nm Intel/Micron MLC flash memory (29F64G08CBAAA).
The big problem with this drive is the very unfortunate alignment of the ZIF socket. Unlike any other 1.8″-drive I came across, this drive has to be installed upside-down due to the idiosyncratically flipped ZIF socket. I can only assume this drive was mainly designed as replacement disk for the last-gen iPods or first-gen MacBook Airs. The drive per se will not fit into the Fujitsu U2010 without modification. This is probably true for a lot of other UMPC and netbook devices, too.
The only way to get the drive installed is to remove the metal enclosure. The flat-ribbon ZIF cable can not be twisted due to its length. Removing the enclosure will ultimately void the warranty as you will have to break the seal on it. That is a risk I am willing to take. Either way, I have been running the drive for more than a month now and had no problems whatsoever. Great performance compared to the old Samsung drive.
Below are some obligatory benchmark screenshots, though I have to mention that Eastwho states that their controllers are not benchmark-friendly due to the techniques they employ to ensure low access times.

Disable the auto-hide functionality of Ubuntu Unity 2D

The current version of Unity 2D that comes with Ubuntu 11.04 Beta 2 does not feature any sort of configuration panel and unfortunately there is no easy way to disable the auto-hide feature of the Unity 2D panel. Here is a short script that will give you an icon on your Unity panel to toggle (enable or disable) the auto-hide functionality:

Copy the following script to
/usr/local/bin/unity-2d-toggle-autohide.sh :

#!/bin/sh

if [ $(gconftool-2 --get /desktop/unity-2d/launcher/hide_mode) -eq 0 ]; then
        autoHide=1
        useStrut=false
else
        autoHide=0
        useStrut=true
fi

gconftool-2 --type=int --set /desktop/unity-2d/launcher/hide_mode $autoHide
gconftool-2 --type=bool --set /desktop/unity-2d/launcher/use_strut $useStrut

Now create a menu entry for this helper script and save it as
/usr/share/applications/unity-2d-toggle-autohide.desktop :

[Desktop Entry]
Name=Toggle Unity 2D Panel Auto-Hide
Comment=Enabled or disables Unity 2D's panel auto-hide functionality
Icon=gnome-fs-desktop
Exec=unity-2d-toggle-autohide.sh
Terminal=false
Type=Application
Categories=Utility

Finally from the Terminal start nautilus /usr/share/applications and add the new entry “Toggle Unity 2D Panel Auto-Hide” to your Unity 2D panel via dragging and dropping.

Clicking on it will toggle auto-hide.