“Yet Another Zaurus Media Player”… done differently . (Phase 1: Teasing)

{YAZMPDD} YAZMPDD - Work In Progress Screenshot 1: Whole library loaded. Contrast mode, perfect for car usage.{YAZMPDD} YAZMPDD - Work In Progress Screenshot 2: Playing a file...{YAZMPDD} YAZMPDD - Work In Progress Screenshot 3: Library view filtered...

Tell me what you think. I won’t comment on anything though. This is work in progress – it’s not finished. I won’t publish any additional features besides what you can read below.

Here is the information I can give right now:
Yes, this is derived from ZPlayer, however, the core is different. Right now, please don’t ask any question why I’m not contributing to Kino or ZPlayer. This is a whole different thing here and I’ll comment once I release.

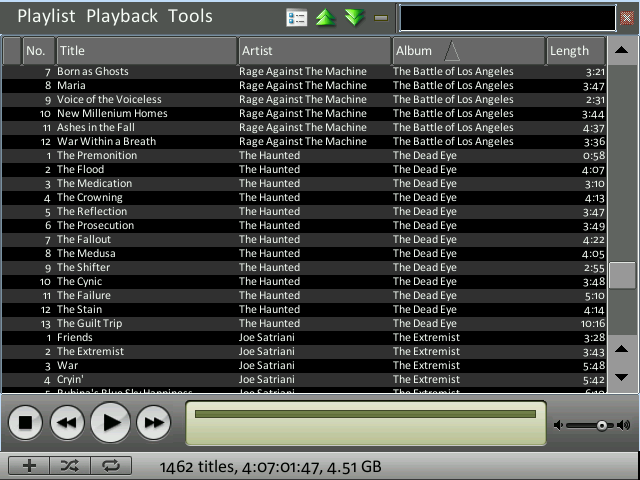
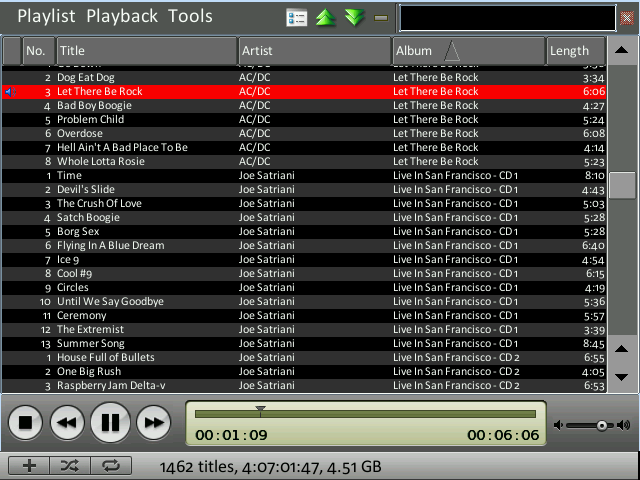
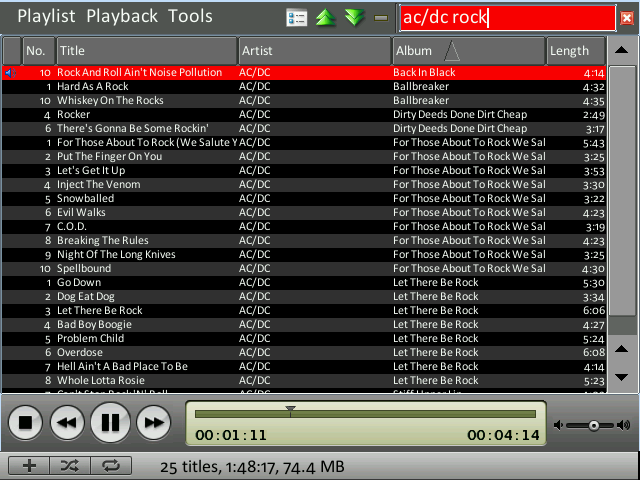
Does it handle large amounts of music? YES.
Are you serious about the *Tunes look? YES.
Is that fullscreen? Yes.
What’s the name? No title yet. If you have a good one, don’t hesitate to mail me.

In the meantime wait for more information and the next phase… :)

Zaurus ARM Cross Compiler on OS X (Intel)

Andreas Junghans has an excellent tutorial on how to set up a Zaurus ARM cross compiler on OS X. However, there is one problem: It will only compile on PowerPC.
So, here is my patchset for compiling on Intel:

gcc-patches.tgz

Use this file instead of the one offered on his page and just follow his instructions.
The fix is really simple in nature: I’ve just added one file, namely xm-openstep.h in gcc/config/i386. This does the trick.

Apple Cube Biohazard graphics card mod

Since I’m in the mood to document various hardware modifications, here is a link for the archives:
http://www.katastrophos.net/macosx/9000pro-mod.html
This is a tutorial written in German for a mod I did way back. It describes how to modify the case of an Apple Cube to actually insert a better graphics card along with proper cooling of the components.
Much of the article deals with how to relocate the DC/DC board to the inside of the Cube to make way for the bigger graphics card. It goes on to describe how to modify the graphics card with a better heatsink. Finally, it shows how to cut the outer casing for proper cooling.

You might ask, why this is called Biohazard mod. Check out this and that.

The Mac Mini external SATA hack

So, finally as promised, here is my short picture walkthrough on how to do the Mac Mini external SATA hack.
I’ve added quite a few comments to the images.
And before you start complaining about the bad picture quality, I’ve shot the whole procedure with my non-HD DV cam, sorry. The pictures are from several takes, so they might differ at some stage.
Anyways, just click on the first image below to start the slide show – navigate by clicking the left or right side of the photo.
I hope you like it and please leave me a comment afterwards. Thanks!
Continue reading “The Mac Mini external SATA hack”

WD Raptor + Mac Mini Intel = external 10k rpm SATA madness

Alright, I had this crazy idea last week: Let’s see if I can somehow route the internal SATA interface of the Mac Mini to the outside of the case so I could attach a bigger and faster external (e)SATA drive. Well, guess I wasn’t the only person with such ideas:
Perle over at 123Macmini.com already has brief instructions on how he did the internal to external mod.
I’ve made some refinements to his process which I will post shortly – along with a few pictures and links where to get the parts. Update: It’s here.

So, after doing the science (finding the right adapters and cables etc.) and tearing apart the Mac Mini with a pizza cutter (yes, you read right!), I finally have my fast drive (Wester Digital Raptor WD1500ADFD 150 GB @ 10k rpm) and the Mac Mini is still as energy efficient as previously – mostly due to the fact that another FireWire drive is now in standby mode most of the time.

That should make me the first person with a WD Raptor in use on a Mac Mini. W00t! ;)

Obligatory XBench results that mean absolutely nothing:
Madness
Comparison with modded 7200 rpm Mac Mini

I’m using the Pleiades Super S-Combo external enclosure with the WD Raptor. The enclosure is made of aluminium. No cheap plastic parts here. It’s pretty solid and the aluminium functions as passive heatsink. That way, even under load the Raptor won’t cross the upper 55°C specification limit. My initial thought was that given the S-Combos universal FW400/FW800/USB2.0/eSATA-bridge it may perform worse than when connecting the cable directly to the drive. This is not the case. Actually, some benchmarks performed slightly better. I can only assume this being due to some sort of caching going on inside the bridge.
Also, if you think the drive is loud with its 10000 rpms, I can assure you it isn’t. Actually, in idle mode it is very much on par with the latest Seagate Barracuda drives which have a reputation for being very silent. The only thing that’s loud are the access noises, but in my opinion it’s not annoying.

C3200 Tweak #2: Improving Samba performance

The preinstalled Samba server on both Cacko and standard Sharp ROM proves to be notoriously slow. This is mostly due to the strict syncing that’s enforced in the smb.conf – probably to avoid data loss. IMHO, it’s rather safe to disable this behavior and in turn get a nice speed bump. Here is how to do that:
On Cacko first delete the default link to the ROM copy of smb.conf:

sudo rm /etc/samba/smb.conf

Now, copy over from ROM and modify the copy:

sudo cp /usr/lib.rom/samba/smb.conf /etc/samba/smb.conf
sudo mcedit /etc/samba/smb.conf

Comment out lines

strict sync = yes
sync always = yes

Change the socket options line to

socket options = TCP_NODELAY IPTOS_LOWDELAY SO_KEEPALIVE SO_RCVBUF=131072 SO_SNDBUF=131072

Please remember to reconnect the mounted samba share on your desktop system.
In my case the transfer rate on my Buffalo 10Base-T CF-Card jumped from 350 KB/s to over 820 KB/s.

C3200 Tweak #1: FAT32 to Ext3

I don’t need the ZaurusDrive feature of the newer Zaurii for the internal harddrive. So, having ext3 on this drive instead of the regular FAT32 opens up some possibilities (read: Debian install :) ).
So, here is how to turn the biggest partition of the internal harddrive on a C3200 from vfat into ext3fs:

Edit /sbin/hddmount and /root/etc/rc.d/rc.rofilesys and change all occurences of

mount -t vfat -o noatime,quiet,umask=000,iocharset=utf8 /dev/${IDE1}3 /hdd3

into

mount -t $LINUXFMT -o noatime /dev/${IDE1}3 /hdd3

These instructions refer to Cacko ROM 1.23. They might be different for the original Sharp ROM.

Now, before reformatting /dev/hda3 with

mkext2fs -j -b 2048 /dev/hda3

Make sure to backup all content on this partition before doing so.

New Zaurus

So, I finally made the jump to the new C3x00 series. Bought myself a SL-C3200 at Pulster. And now I’m sitting here setting up everything and enjoying the new freedom (6 + 2 GB, that is). What a mean little machine! :)
The additional storage capacity is excellent compared to my C750, where the limited support of SD-Cards up to 1 GB has become a big drawback for me.
In normal use the machine itself is not necessarily faster than the C750. However, at everything multimedia it flies. DivX movies at 640×300 were slideshows previously, now they play back in smooth realtime – thanks to mplayer/bvdd/iwmmx. Also, battery-time is very much improved. I’ve actually tested MP3 playback the other day with the display turnt off and only XMMS and my Buffalo Ethernet card (very low-power) running. After round about 10 hours it was me that had to go to sleep. ;) So, no idea how long it would have had lasted, probably 3 hours (battery was at 30 % when I turnt the device off.).
Anyway, I’ll be posting some Zaurus-related stuff later. So keep an eye on that. :)