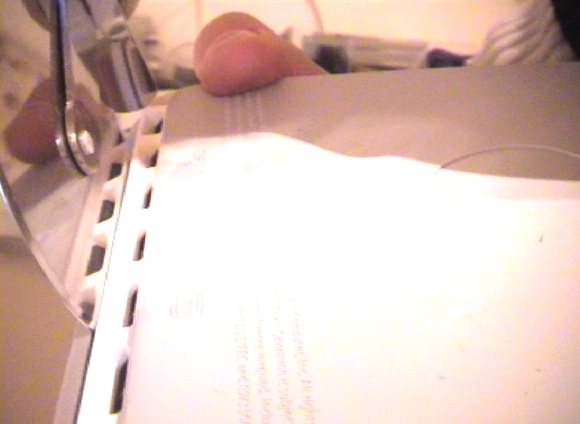
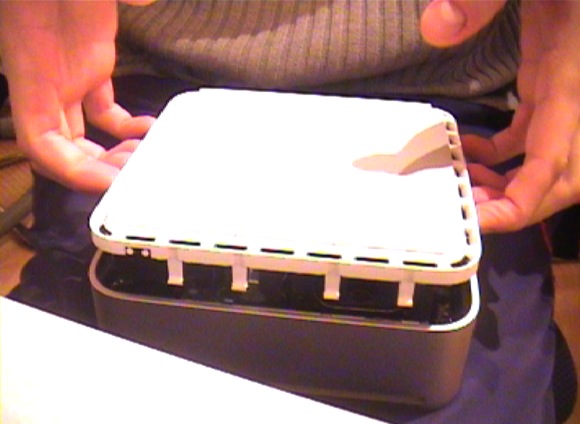
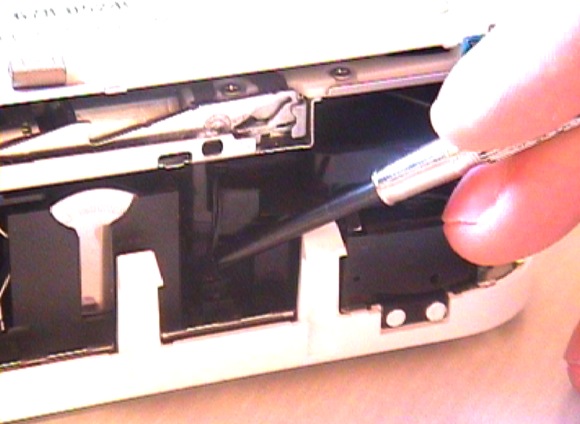
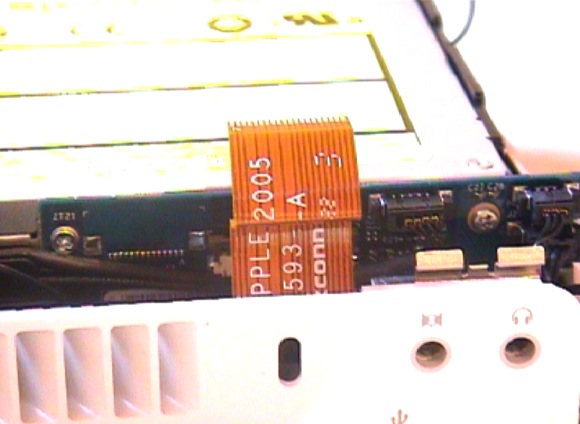
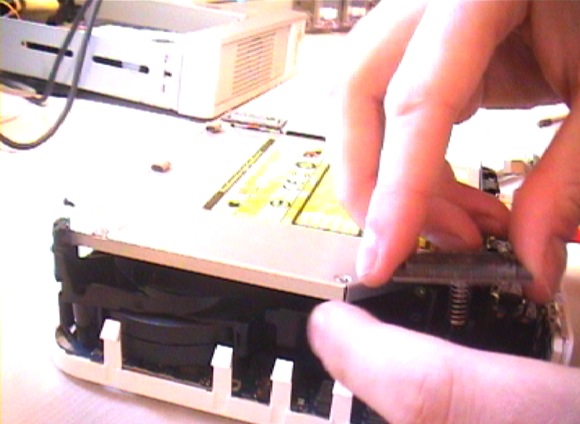
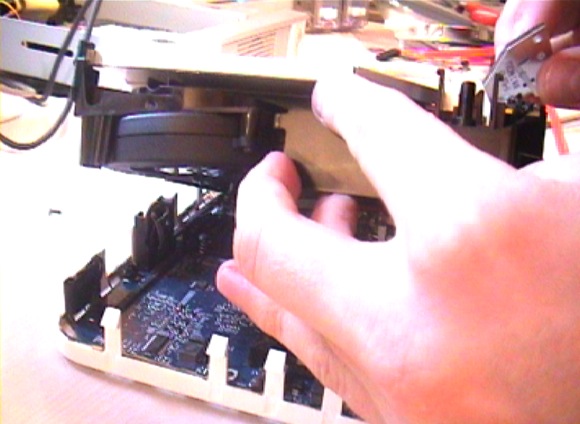
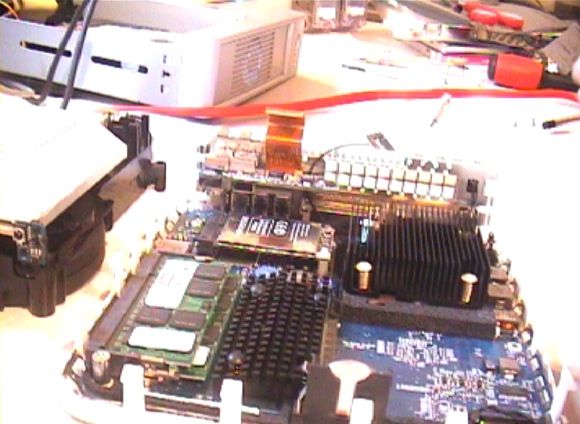
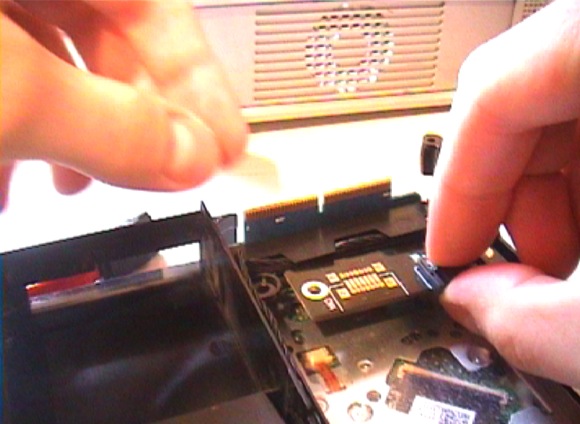
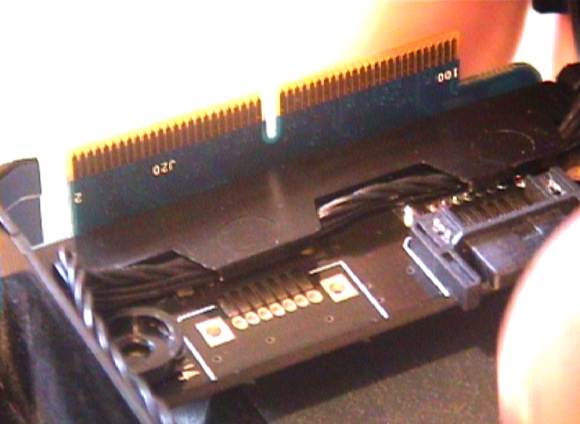
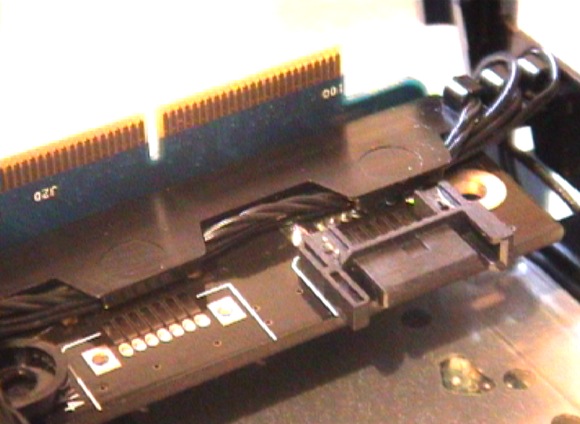
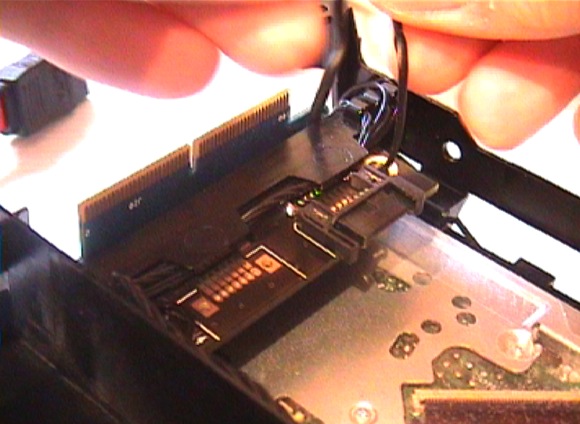
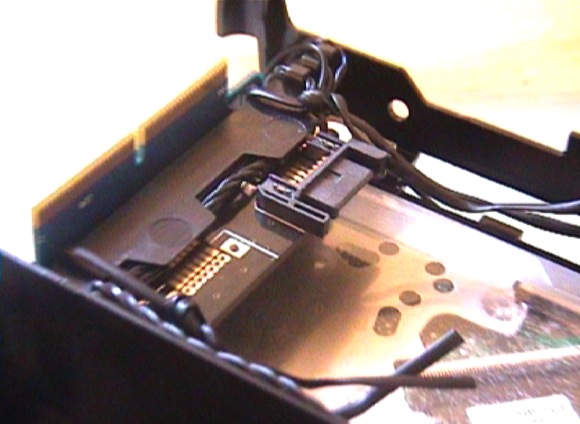
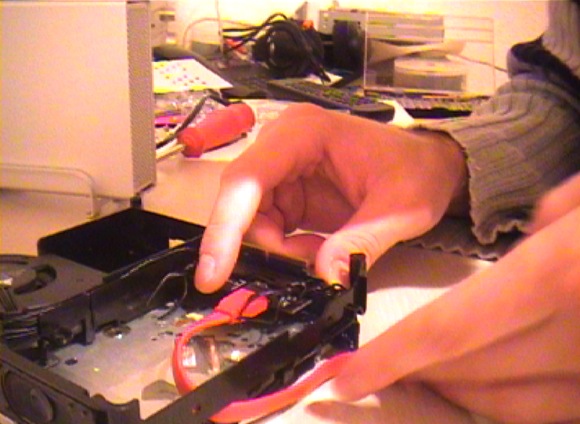
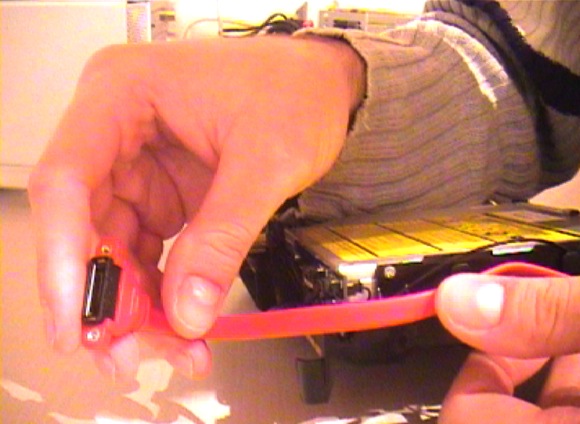
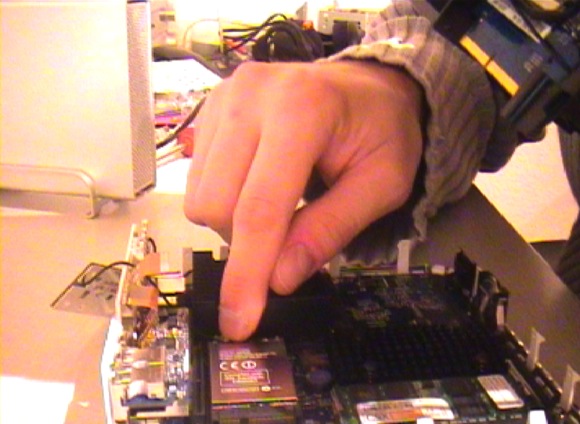
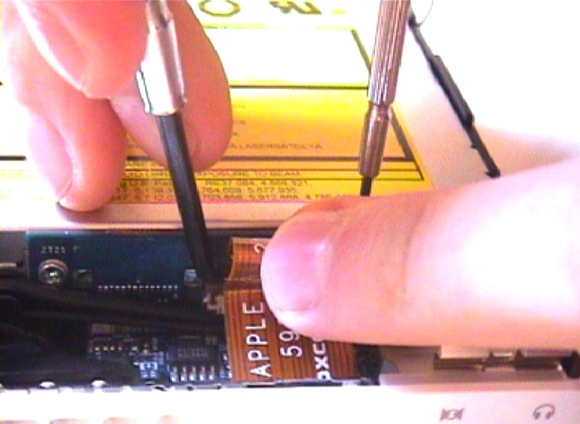
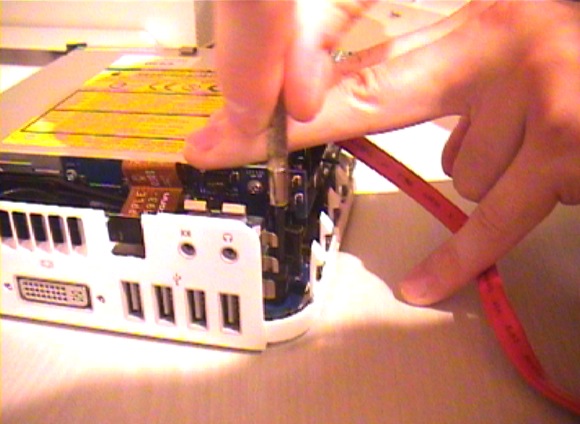
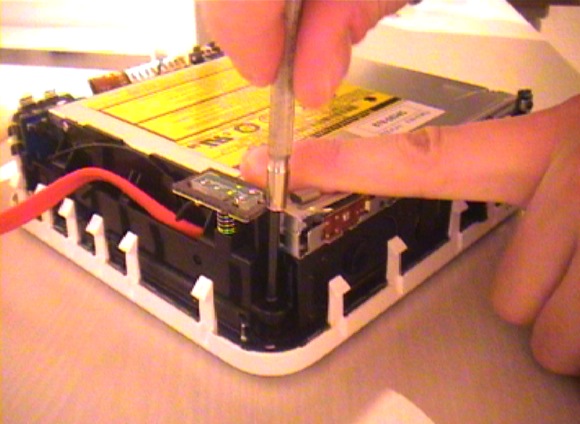
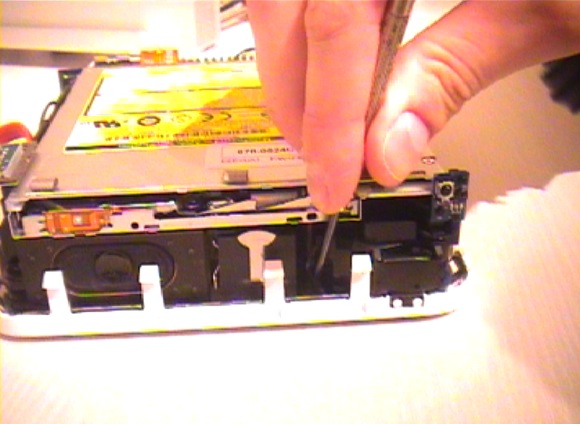
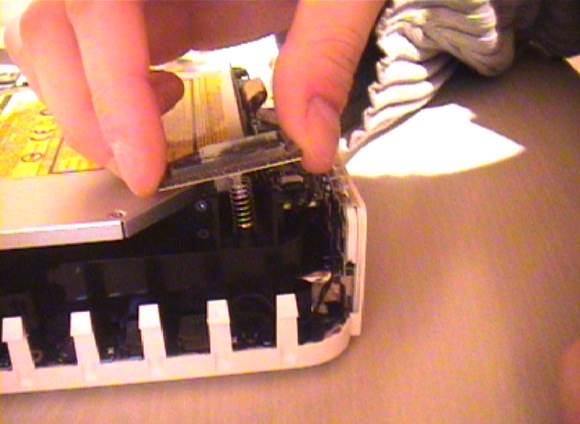
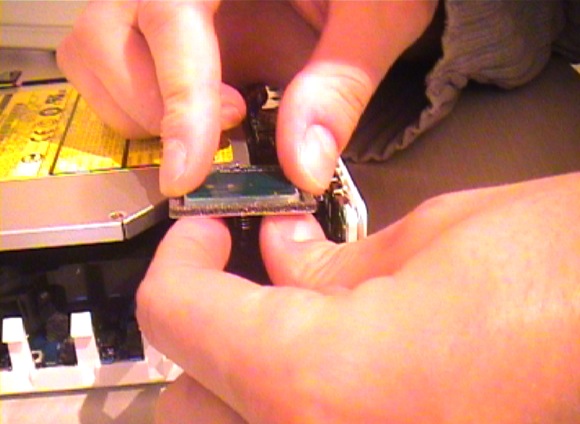
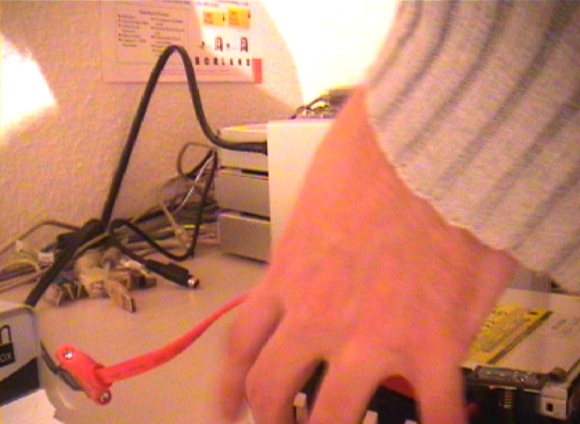
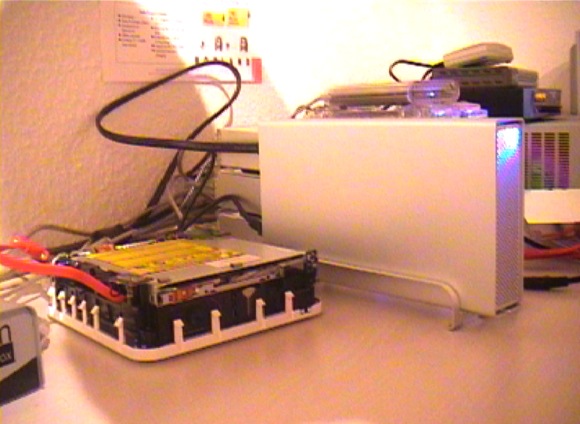
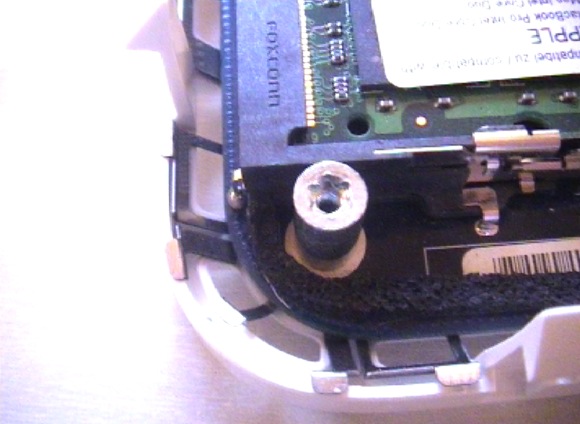
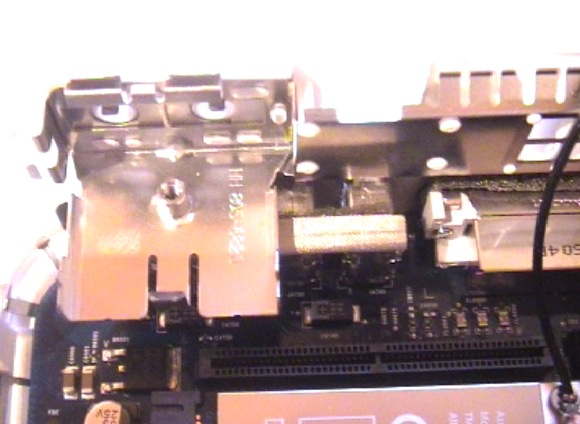
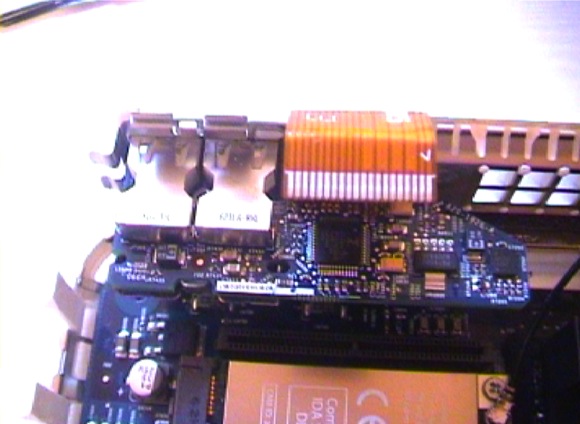
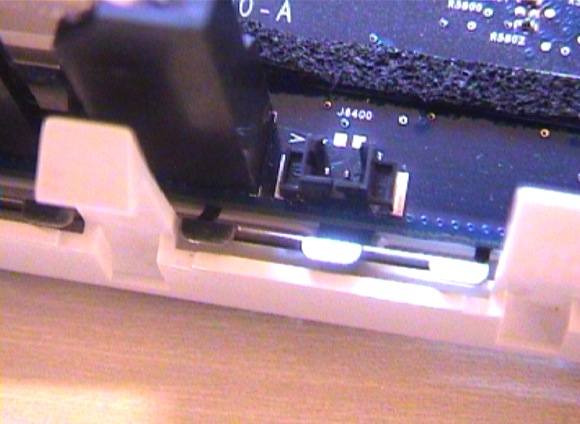
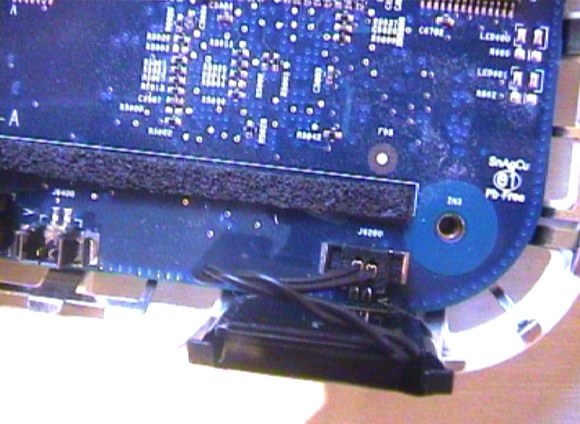
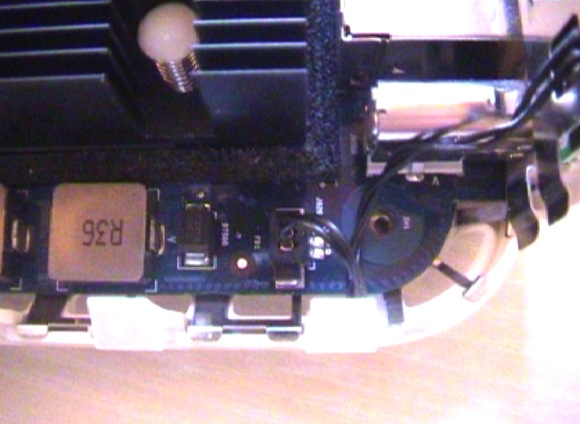
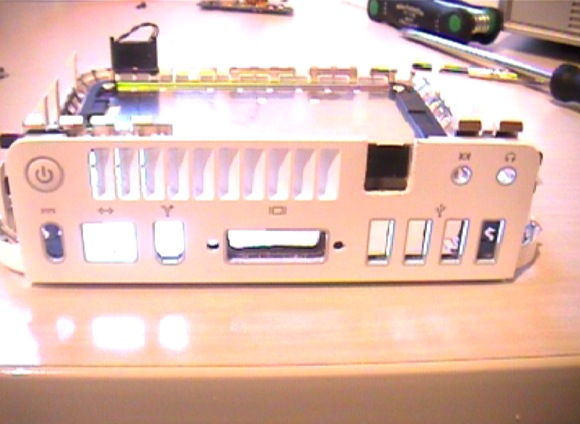
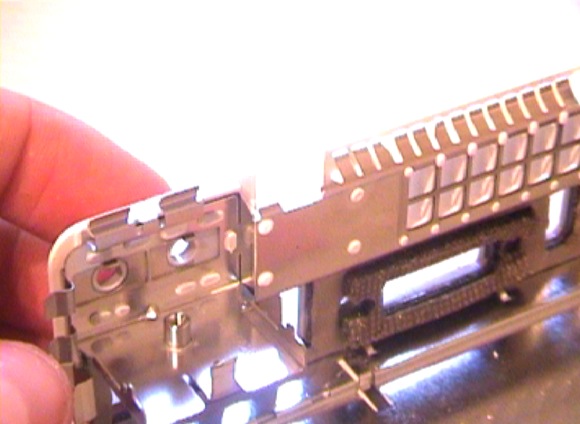
So, finally as promised, here is my short picture walkthrough on how to do the Mac Mini external SATA hack.
I’ve added quite a few comments to the images.
And before you start complaining about the bad picture quality, I’ve shot the whole procedure with my non-HD DV cam, sorry. The pictures are from several takes, so they might differ at some stage.
Anyways, just click on the first image below to start the slide show – navigate by clicking the left or right side of the photo.
I hope you like it and please leave me a comment afterwards. Thanks!
Ah, one more thing if you want to try it yourself: As usual… warranty is void!
Don’t blame me, if you screw things up – even if you’ve followed the method described here precisely. It’s your fault. I won’t take any responsibility for any damage. It’s your fault. You have been warned.


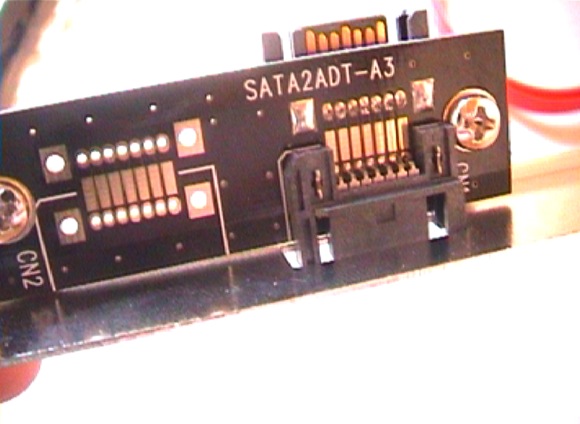


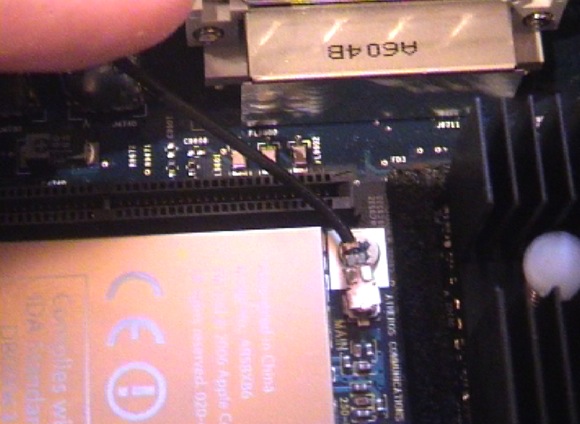


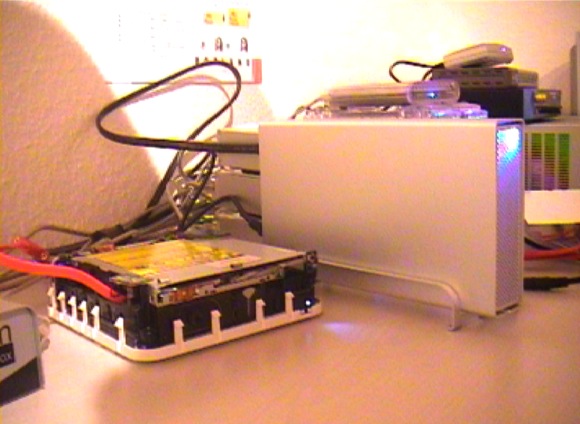


List of parts used:
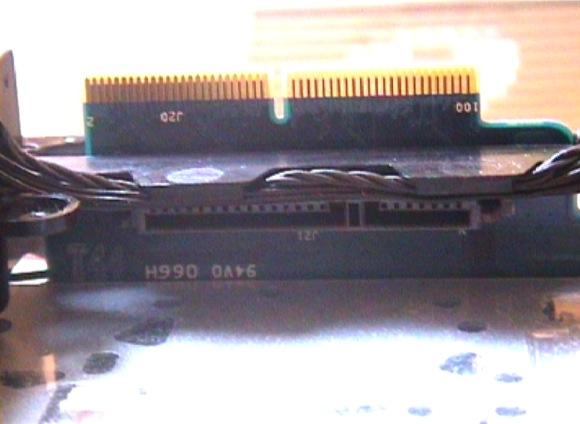
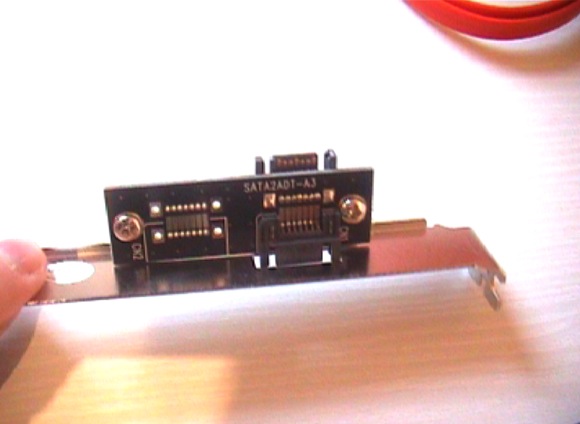
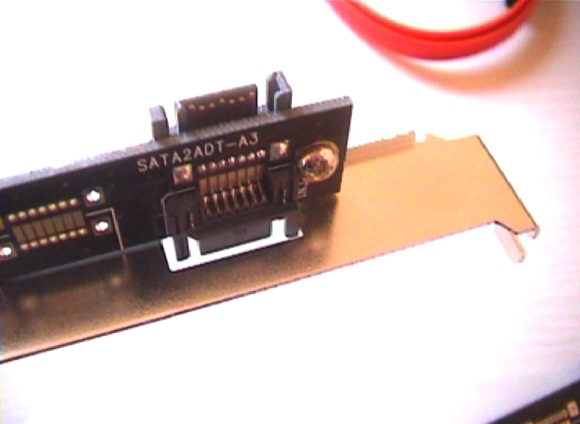
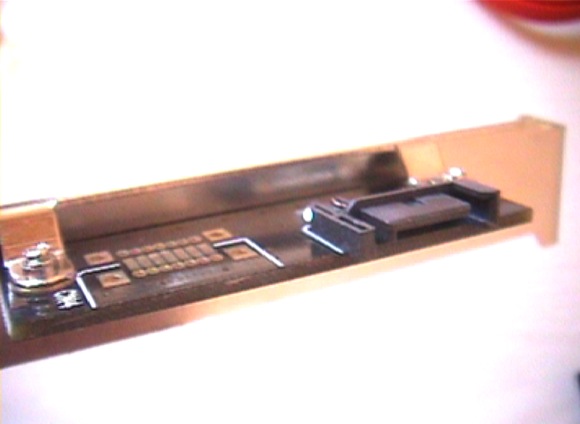
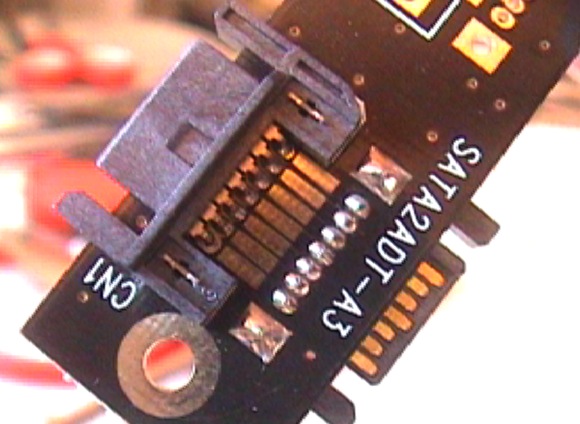
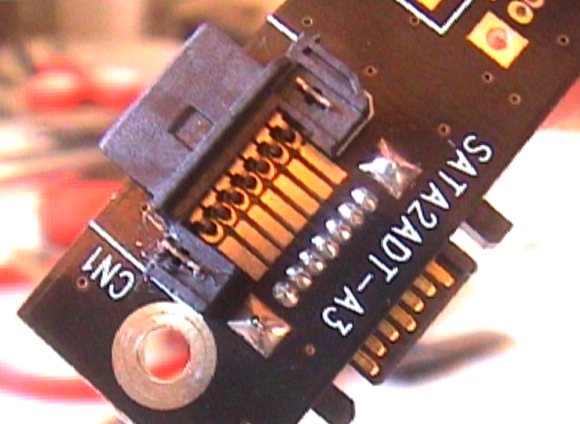
1x internal SATA to external SATA (not eSATA!) adapter slot bracket (board-based)
Manufacturer: DeLOCK
Part# 65115 – SATA2ADT-A3 (order @ Reichelt – AK 668)
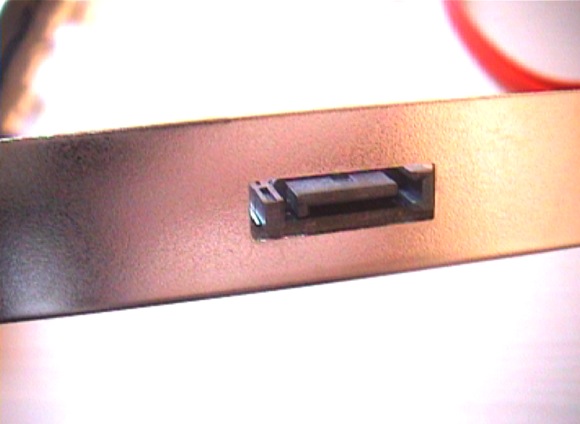
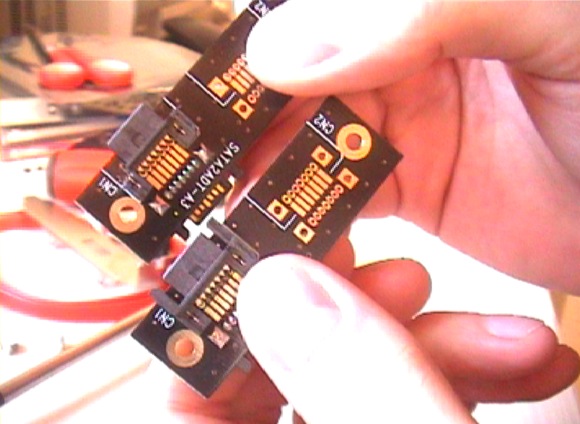
1x internal SATA to external SATA (not eSATA!) adapter slot bracket (non board-based)
1x SATA to eSATA cable 1m (order @ Reichelt – AK SATA 0702)
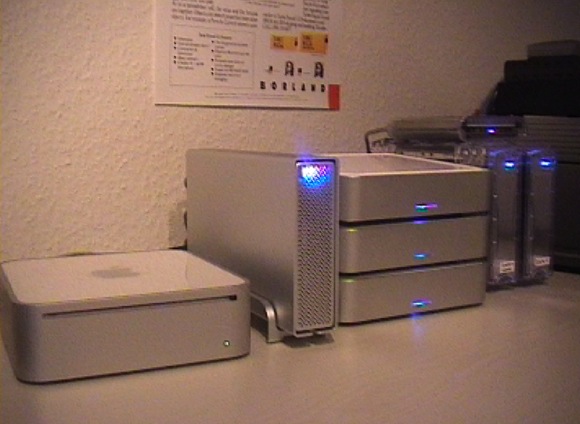
1x Macpower Pleiades Super S-Combo
If you can’t get the 2nd adapter slot bracket, just get the cable and directly attach that to the adapter board and route it to the outside of the case.
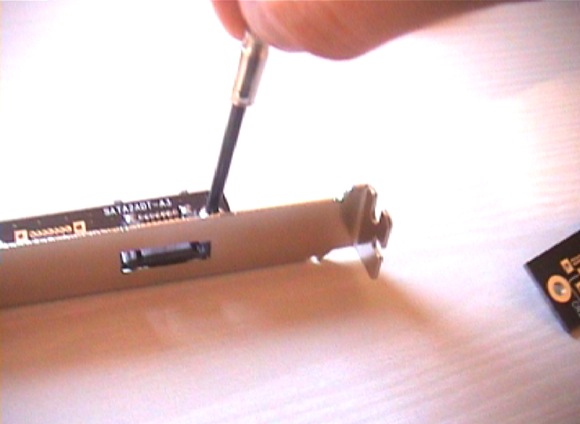
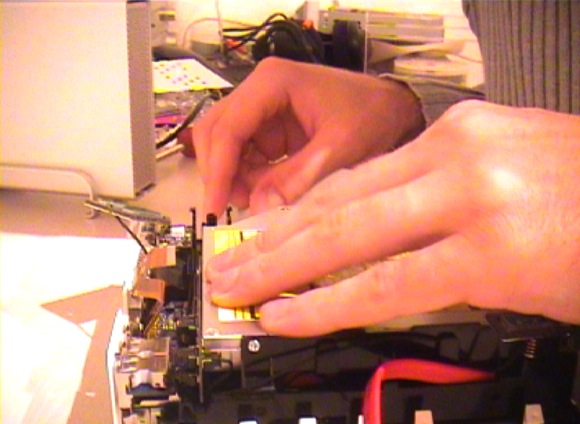
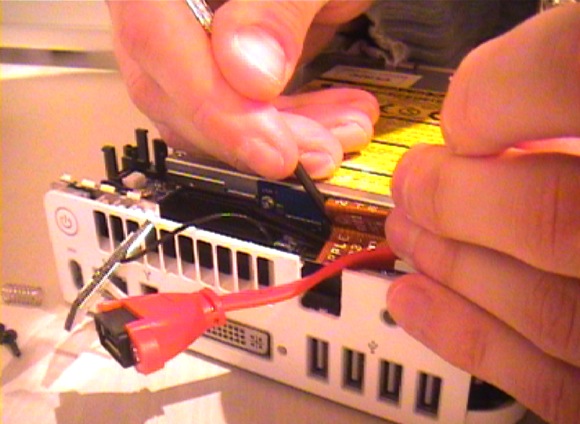
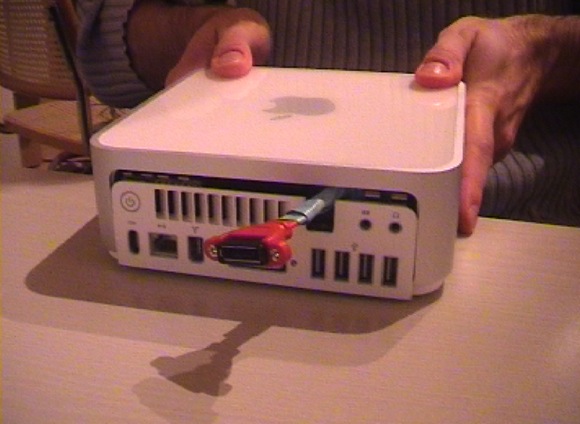
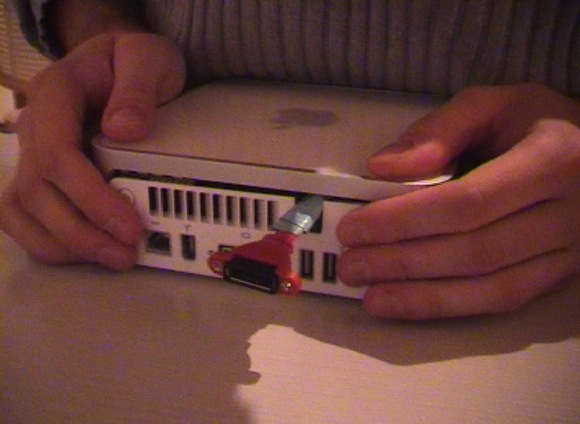
As for the case modification: I’ve made a few photos to illustrate the process. However, I won’t add any comments. This is quick’n dirty work.

You’re the man. That was exactly the info I was searching for! Thanks!!
Totally awesome!!!!! Just out of curiosity, where did you purchase the Pleiades enclosure????
No idea where to get them in the U.S.. Probably at Newegg…
Rosewill ( http://tinyurl.com/yylq4r ) is offering rebranded Macpower enclosures, but the S-Combo seems to be missing.
Span.com (UK) has got them, but they are expensive:
http://tinyurl.com/yd6up5
I bought mine at Cyberport, a german retailer:
http://tinyurl.com/yhkr5a
Also, you may want to check out the G-Drives, which are similar to the Macpower enclosures:
http://www.g-technology.com
Nice work Andre.
One question: How do you switch the external HD on and off? I though about master slave sockets but have some doubts if this will work with the suspend mode. Any experience?
Hi Jens, thanks. :)
The system is running 24/7. However, if I turn off the Mac Mini or put it into sleep mode, the external HD will spin down.
To be honest, I have no idea if a master slave outlet will work because I don’t own one. But from my experience I can tell it’s no problem if the HD is powered on a second or two later than the system, which might be the case if you’re using such an outlet.
” To be honest, I have no idea if a master slave outlet will work because I don’t own one. But from my experience I can tell it’s no problem if the HD is powered on a second or two later than the system, which might be the case if you’re using such an outlet. ”
Master / Slave outlet won’t work, surely when the Intel Mac Mini is on the master outlet. The difference in the current when powered on, is too less to fine-tune a master / Slave outlet.
My apple build HD case is on the Master Outlet to turn on power for: Mac mini power brick, Monitor, speakers. I have to push the Intel Mac Mini button at the back afterwards.
Lara
Nice work. I was wondering why Apple didn’t include eSATA support. Thanks for the pictorial steps.
Hello. Do you think it might be possible to add an eSATA socket without disconnecting the stock SATA drive? That is, so that you can use the internal SATA drive, and also plug in an external eSATA drive in the same way you can plug in an external Firewire or USB drive?
I can’t think of one.
@Damian,
When I’ve builded my system I’ve thought about a port multiplier described at:
http://www.sata-io.org/portmultiplier.asp
The question is: Has the mac mini a 1,5 or 3 Gbps Sata-bridge build in.
And, can it work with a port multiplier placed in my HD-mac-box. This SIte demonstrate a parrallel access to more drive (by the multiplier). But as you can see, I thins dependent on the Sata-build-in the Mac mini, you need the command from the internal Sata-bridge (mac mini) to drive the multiplier.
http://www.sata-io.org/portmultiplier.asp
Notes also, that the multiplier without the needed command act as a selector, so a drive at the time …
Difficult to explain, but read it . . . Maybe it’s pssible
Lara
It’s about a FIS commmand that must be enbaled in the Sata-bridge in the mac mini. Also it has todo with the Sata version . . . and the OS ofcourse
Lara
@ Lara
Oh, that’s an interesting possibility. Thanks.
Damian
What’s the chance this will work with the Apple TV?
Hi
I can’t be bothered with anything these days, but shrug. I just don’t have anything to say recently.
Bye
In image 11 you say we need an adapter that has female sockets at both ends……I think you mean type L male sockets at both ends? I think its called a male to male coupler or bridge. This may work, halfway down this page:
http://www.cs-electronics.com/serial-ata.htm
And a big picture showing its a type L, not a type I.
http://www.cs-electronics.com/images-large/SATA-7M7M.jpg
I guess you’re in Germany. I’m in Canada and have not found any seller in the entire country that has it. US sellers don’t want to ship across the border to me. I feel so rejected! AARRGGHHH!! :)
Cooldrives.com sells a Type L Male to Female Sata cable (red) that should work perfectly for $5 plus a little shipping.
http://cooldrives.com/sacaexsa7sic.html
Another option is this:
http://www.mcpb.com/html/sta2.ie1x.cbl.html
With both of these you’ll have to grind down the male plug a bit.
But is it possible to power the 3.5″ drive from the power receptacle of the Mini that originally powered the 2.5″? Its to the left of the data plug of course. Then you could make it sleep and do other stuff I guess. I wonder if the power requirements of a 3.5″ are very different from a 2.5″? And if so, would it relieve the power supply somewhat if you removed the slot loading drive and ran the DVD drive externally? After all, most people don’t use the DVD drive very often.
As for the exiting of the Sata cable out of the Mini: If you don’t want to hack a hole in your Mini, why not just Leave the back not completely closed allowing for about 1/16″ gap for the Sata cable to pass through? It should look the same from the front. Its kind of a shame to gouge something if its not really necessary. And hey, maybe it will run a little cooler.
And has anyone tried replacing the CPU heatsink with a chipset heatsink off a typical PC? Thermaltake 05 might work OK. The footprint looks small enough and one of the mounting brackets could fit if both mounting holes are filed a tiny bit to make them slightly longer. Of course then you couldn’t run it with the top on but once again, you wouldn’t destroy your warranty as you could replace the original heatsink and hard drive if you needed to bring it in for service. Its no small consideration if you’ve paid for 3 years of Apple Care.
@MEME: Just work out the sata-data part outwards the Mac-mini case. And try to replace the litlle HD in the Mac-mini with a dummy. This because a guy from the nederlands heated up iets Mac-mini. Second. Make a new HD case where the SATA HD will fit in. Use a Seperate power-supply instaed of working a power cable out of your new mac-mini. Imagine using a 10.000 RPM drive on the internela power of your mac-mini. The chance is you will blow up the circuit-board in your Mac-mini.
So, route only the Data part of the sata out of the mac-mini, and place the new SATA hd in a powered HD case case, or your own D.I.Y. case.
Lara Boons
After looking at the Mini, I can’t imagine having the hard drive in there helps any heat issues. The Mac Mini is a terrible design in cooling. When I first got it I couldn’t believe how hot the exiting air was. Then I realized they have the CPU, Video chip, and hard drive, as well as the optical drive all crammed in there generating heat. And a 2″ fan is supposed to adequately cool that? (I don’t think so!). In my old mini which I run without a top it runs totally cool. No hard drive, no optical drive of course. No top.
With the Intel model I turned it no without the CPU fan connected and the cpu heatsink hardly got warm at all. So nice. It might even be possible to position a 120 mm fan on to the MIni and it might be enough to cool everything.
But my question was more leaning towards using a typical Sata 3.5″ 7200 rpm drive. Without the optical drive being powered by the MIni I wonder if it would work? And I wonder if there are any male Sata power adaptors that connect to a female Sata or LP4 (traditional IDE type 4 pin Molex connector) male connector? I quick Google didn’t bring up anything. Being able to sleep is quite nice for a lot of people. It would be nice if the Mini could control that.
[…]will it work with the Apple TV?[…]
Just wondering, how much would I have to pay you to mod a new mac mini for me? Just curious!
Hello,
I was wonder if anyone knows were to buy a cable like:
Male SATA 7-Pin DATA to Female ESATA 7-Pin Cable 20inch ?
With these will be easy to hack the mac mini :)
Thanks
Have you tried RAID 0(2 external S-ATA drive)?
Wondering if it’s possible.
Help… just purchased a miniStack V3.
I cloned my internal disk with DiskDuper. The miniStack V3 boots fine under firewire.
But when I removed my internal hard disk from my mac mini and connected the sata connector from the ministack v3’s internal oxford board directly to the Mac mini’s internal L sata connection (as described – I used modified sata cable) – it does not boot via sata/esata.
It continues to boot fine with fireware. Do I need to enable some form of sata bridging function to allow booting esata in this configuration in the miniStack V3?
I am running Leopard 10.5.2. No other drives except the internal DVD.
Hello stwoods,
First of all, The mac-mini can boot from E-sata you build, but the harddisk must first spinning and powered on in the external case.
Second, there must sometime to boot on the E-sata connection.
Third, maybe change the boot-order in the system panel
Lara Boons
I’m now using the Intel Mini on its side, with one 120mm fan (@ 12 volts) cooling everything. The fan sits on the table in front of the Mini. I removed the plastic housing that held the fan, hard drive, etc. It runs so cool now as the fan now oools the entire board (CPU, chipset, ram, etc)! The system never gets above about 35C and usually the CPU temp is only about 5C above ambient. (Right now its 22C with ambient about 17C). I can’t even hear it if I’m a few feet away. And it never ramps up like the 2″ fan does when its under load. The same generic ATX power supply that powers the hard drive also powers the fan. You can add another 120mm fan to cool your hard drive as well of course. I don’t have my hard drive in the typical cramped external case that most external hard drives are stuffed into so my hard drive temps are low.
I’d sure love to be able to run two or four 10k 16mb Sata WD Raptors in Raid 0 on this thing. Guess that’s not possible yet though. If Apple had put a eSata jack with port replication on this thing, just imagine the performance and storage possibilities one would have. They could have sold so many external Sata enclosures for it as well.
I next tried a 10000rpm Sata Western Digital Raptor hard drive for the OS and Applications/Programs. Wonderful. I leave all my data on a firewire external drive. Its really zippy. You can use a 36gb, 74gb or 150gb. They come in 8mb or 16mb cache versions. All are reasonably priced if you buy them used. They have a long lifetime expectation – so they are very reliable. Highly recommended.
Next is replacing the Core Solo 1.5ghz CPU with a Core2Duo CPU.
I’d love to overclock the Core2Duo CPU but I haven’t read about anyone that had done it yet. It shouldn’t be difficult mounting a quality heat pipe designed heat sink (Scythe, Thermalright, Tuniq, etc) on it with some fiddling. With that plastic housing gone (that used to hold the optical drive, hard drive and fan), there is much more room to work.
Oh…if you’re not using the PCI-E wireless card, remove it. Just one more thing in the way.
Hello,
Thanks for this how to.
I try to found the adapter, but I can not.
I’m in France and
http://www.reichelt.de/?;ACTION=3;LA=4;GROUP=C694;GROUPID=3337;ARTICLE=50855;START=0;SORT=artnr;OFFSET=16;SID=27VpCceawQARsAAAcdH@I7784fc2879a36ee7ad1fb97e7dcd8645
web site is in german
http://cooldrives.com/2saintosaexp.html
web site do not deliver out of US :(
Somebody can help me ?
Thks
Hello,
Thanks for this how to.
I try to found the adapter, but I can not.
I’m in France and
http://www.reichelt.de/?;ACTION=3;LA=4;GROUP=C694;GROUPID=3337;ARTICLE=50855;START=0;SORT=artnr;OFFSET=16;SID=27VpCceawQARsAAAcdH@I7784fc2879a36ee7ad1fb97e7dcd8645
web site is in German
http://cooldrives.com/2saintosaexp.html
web site do not deliver out of US :(
Another one : http://3logic.ru/?A=5&SI=1&I=12434
Somebody can help me ?
Thks
I found this site that may have the correct parts –
http://www.cpustuff.com/Serial-ATA-Adapter-p-1-c-277.html
I’m think that these 2 adapters should work work for this mod –
http://www.cpustuff.com/7-Pin-Male-Male-Serial-ATA-Data-Adapter.-7MALE2M-p-16190.html
http://www.cpustuff.com/22-Pin-Male-Male-Serial-ATA-Data-and-Power-Adapter.-22MALE2-p-339.html
Don’t know if they do international sales. I’ll order them and give it a try and report back here with the results.
Well, the parts arrived yesterday and today, using the 22 Pin Male – Male Serial ATA Data and Power Adapter (http://www.cpustuff.com/22-Pin-Male-Male-Serial-ATA-Data-and-Power-Adapter.-22MALE2-p-339.html), a female SATA to eSATA cable, i was able to complete this hack and have my Mac mini boot from an external SATA drive.
I’m pretty sure the 7 Pin Male – Male Serial ATA Data Adapter would have worked also, but it would have been more difficult to secure the adapter and cable to the riser board. The 22 Pin Male – Male Serial ATA Data and Power Adapter, having more surface area was easier to secure.
Good luck to everyone else who wants to give this a try.
Couple of thoughts, questions… etc.
I have the impression that the internal sata port controller doesn’t support port multiplication. Can someone verify this? I’d love to hook up a drive array to a mini.
For that matter would an external sata hub alleviate the problem? Or would it stuff be botched by the internal controller?
And lastly / most extremely.
Since as an early poster noted the PCI-e wireless card might be sacrificed… could it be possible to sub in a modded PCI-e sata card (firmtek or sonnet) that supports port multiplication?
I’m trying to figure out a nice little file server option for my home office. I have a GSpeed hooked up to my main mac, but I’d like to put the drives in a closet (less noise for me) and use gigabit ethernet for my workstations to grab/share files. The 6ft max cable for the eSata is limiting my ability to shove it in a closet as is.
Also, I just got married and I’d like to create a dope little media center for the new wife, videos and music anywhere in the house, you know.
This mini sata thread got me thinking…
I’m going to need to get my hands on a mini now, either way. Refurbs here I come!
-greg
No port replication on a Mini. That would be too smart for Apple. Give too much power to the customer. And take away some of the Mac Pro’s sales.
The PCI-E idea is great. Can you imagine the potential of that silly Mini if they had a few PCI-E slots in there? Video enhancements, eSata, etc.
Basically its like swimming up a river with Apple. They are going to try to stop the tinkering as much as they can. Better to get a simple PC, run OSX86 and XP, each on its own hard drive, and have the best of both worlds for almost no expense. Total freedom with hard drives, video, etc. Back to the real world of computing freedom.
Now who is going to try a Velociraptor on their Mini? (I’ve got one coming soon so I’ll report back when its installed.) Probably won’t make much difference though from the 10k Raptor I’m now using.
do you think is it possible to realize this hack for a MacBook?
Macbook? And lose all portability? If you don’t mind that, sure it should work.
Look: http://www.macminicolo.net/macmini2009.html
The new Mac-Mini is out, and the optical drive is a Sata one.
Interesting !
Lara
It is such an absurd joke when you look at the new Mini. What a pathetic package for a significant amount of money. I’ve dumped Mac and am so much better for it. My PC is far more reliable and for 1/2 the cost I can run HD video.
$40 MOTHERBOARD: Socket 775 (6 Sata, Firewire, Raid, eSata, 6 or more USB)
$40 CPU: C2D 3.3ghz x 2
$20 CPU HEATSINK: For silent operation
$40 RAM: 4gb 800mhz or 1066mhz
$20 VIDEO CARD PCI-E: 256mb
$20 CASE/POWER SUPPLY
$20 BURNER: DVD dual layer
$40 HARD DRIVE: 320gb 7200rpm Sata
__________
$240 Total
$125 22″ LCD (1680 x 1050)
$250 24″ LCD (1920 x 1200)
Upgrades:
$50 more for quad core CPU
$40 more for 4 x 2gb ram
$50 more for 10k rpm Velociraptor HD
———————–
The Mini is so 20th century. Its like Apple thinks they can put anything in a box, price it anywhere they want and the Apple retards will blindly pay. Unbelievable. Wake up people. You’re paying a huge premium to run an OS that gives you far less software choices (which means you’re always running a year or 2 behind in almost all apps) and the hardware choices are just about nil.
Have you seen the Mac Pro? This is the unkindest cut of all. No eSata still. What planet are these people from?
Andre, that’s an awesome hack :)
I just did it for my wife’s aging Mac Mini (I had to be careful where to place the word ‘aging’ in that sentence.. hmm). And I came across a problem: The Mac Mini gets stuck when it tries to reboot. Did you ever come across this?
I use the female-female adapter from cpustuff.com, and a sata-eSata cable to bring it outside, very similar to your mod. Then from eSata I use an external (aluminum) Stardom eSata\USB enclosure. It functions similarly to yours that when put to sleep\standby and shutdown the harddisk will spindown properly, and vice versa when woken up.
Just that one problem with rebooting…
Great hack! I just bought a mini for my HDTV, refurbished prev. model for ~400 USD.
Can’t wait to play with it.
I also own a MacBook Pro and an old G4 iMac.
Bot
Mac Fanbot
The thing I like most about my Mac is it just works… unlike my PC. I guess paying a premium for good hardware and software is worth it.
Could you use this cable in place of the clipped board connector? ]]
http://www.cooldrives.com/sacaexsa7sic.html
Curious but inexperienced when it comes to this.
Thanks in advance
I think it’s possible. Just saw those little hooks away and try. The problem will be locking the connector in place. It glides easy on but also from the board. Lara
very good! it’s very easy. i think that a mod like this it’s harder. thanks.
muito bom! isso é facil eu achei q uma modificação como essa fosse mais dificil
We still Sell the Bracket if anyone need to do the Mod.
http://www.pccables.com/01652.html
Nice tut, i’ve followed this mod on my 2007 24 inch C2D iMac running on a dual bay Raid 0 stripping (stardom SOHOTank) with 2 x WD black cavier HD and it show amazing Read Write speed. =D
Any idea where to source replacement connectors e.g. for the power button, fan temp connector, and LED indicator? I’m building my Mini into a disused G5 Tower case, and extending those cables (without destroying the originals) is the only thing keeping me from a stock look and function.
Also, I have found a great SATA M-F cable at DX that does what I need in place of the M-M board that doesn’t seem to be available anymore. http://www.dealextreme.com/p/sata-7-pin-male-to-female-extension-cable-1m-14062
Hi!
Does anyone know if the ATA controller card supports port multiplication?
I need to attach an external hard drive rack, but if the Mini’s controller card cannot handle port multiplication, I will have to use another computer.
Thanks in advance.