


Files:
Execution
This example requires the example dialer services to be pre-registered in order for the application to discover and load the services. This can be done by using the service framework command line tool to add the corresponding service XML file:
These deployment commands will register the two plugin-based services as well as the remote IPC-based service. The last line features the ability to create an autostarting file for D-Bus if the platform supports the QtDBus module, typically available on Linux systems.
There are 2 ways to run the example:
The XML files for all example services can be found in the QtMobility build directory under install/bin/xmldata.
For Maemo and Linux platforms using D-Bus as the underlying IPC mechanism, the autostart feature can be initialised by running the service framework tool:
servicefw dbusservice xmldata/remotedialerservice.xml dialer_service
Explanation
This example should demonstrate how to use the Service Framework to access a list of services in a QML context. A library plugin provides QML with elements that can reference a single service or a list of services, called 'Service' and 'ServiceList' respectively.
An example that demonstrates how to connect to a single service object to implement a simple note taking application can be found here.
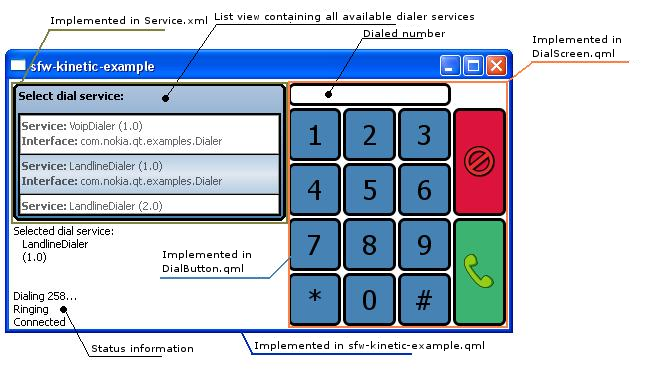
The GUI looks like following picture:
The following steps outline how to make a QML based application using the Service Framework technology. It is assumed that QtMobility has been successfully built and environment variables have been set as per Installation Guide.
Service Framework in QML:
To included the Service Framework QML plugin to our QML file we need to import it as follows:
import QtMobility.serviceframework 1.1
The Services:
The services are implemented in a shared library and can be register in the service framework. After the service is registered it can be used in different applications. In our case we'll access the services over an application that is based on QML scripting. We will be able to change between different services and call their properties, receiving their signals and so forth.
In this example we've implemented 2 services called Landdialer and Voipdialer. You can find the projects for those services in:
declarative-sfw-dialer\landlinedialer and declarative-sfw-dialer\voipdialer. Those projects will create a shared library in each case.
If the library needs to be available over the Service Framework, we need to register the library. In our example this will be done manually by using the servicefw tool. Refer to the project README for further details.
As you can see we register the services using a xml file. This xml file basically contains all information to register the shared library in the Service Framework environment. For more information please read more about the Qt Service Framework XML Format
The QServiceManager creates an instance of a services over a QServicePluginInterface. For each services we provide a Plugin.
 class VoipDialerPlugin : public QObject,
                                 public QServicePluginInterface
 {
     Q_OBJECT
     Q_INTERFACES(QtMobility::QServicePluginInterface)
The Q_INTERFACES macro tells Qt which interfaces the class implements.
Both seviceplugins needs to implement the QServicePluginInterface. In our case we only need to overwrite the virtual function createInstance.
 QObject* VoipDialerPlugin::createInstance(const QServiceInterfaceDescriptor& descriptor, QServiceContext* context, QAbstractSecuritySession* session)
 {
     Q_UNUSED(descriptor);
     Q_UNUSED(context);
     Q_UNUSED(session);
     return new VoipDialer(this);
 }

 Q_EXPORT_PLUGIN2(serviceframework_voipdialerservice, VoipDialerPlugin)
As you can see the createInstance function create the appropriate dialer object and returns it. The Q_EXPORT_PLUGIN2 macro provides the necessary implementation for a plugin. See How to Create Qt Plugins for more details.
The last thing we need to provide in our services are the states, properties, signals and slots that we want to access in out QML script later.
 public:
 enum ConnectionState {
     Disconnected = 0,
     Connecting,
     Connected,
     Engaged
 };
 Q_PROPERTY( ConnectionState state READ state NOTIFY stateChanged)
 ConnectionState state() const;

 public slots:
 void dialNumber(const QString& number);
 void hangup();

 signals:
 void stateChanged();
Service access on the QML site
The QML elements are implemented in 4 different qml scripting files see GUI design.
The first step is to use our ServiceWrapperList to specify the interface and minimum version (optional) through QML item context, which will produce a list of ServiceWrapper objects.
 ServiceList {
     id: dialerServiceList
     interfaceName: "com.nokia.qt.examples.Dialer"
     majorVersion: 1
     minorVersion: 0
 }
In the DialerList.qml file the services property is assigned to the ListView model property.
 ListView {
     id: serviceListView
     height: mainPage.height * 4/10
     width: mainPage.width - dialScreen.width - 26
     anchors.topMargin: 5
     anchors.leftMargin: 5
     anchors.rightMargin: 5
     model: dialerServiceList.services
     opacity: 1
     delegate: delegate
     currentIndex: -1
     clip: true
 }
To show the items of the model property we need to create a delegate component and assign it to the ListView Delegate property:
 Component {
     id: delegate
In this component you can define how you want to draw one ListView item. You can access inside of this component the current ListWiew item by using the variable modelData. In our example we are using two text lines. Furthermore we can define whats happening if we click on a ListView item by using the MouseRegion.
 MouseArea {
     id: listItemMouseRegion
     anchors.fill: parent
     onClicked: {
         if(serviceListControl.allowselction){
             if(listFrame.nohighlightlistitem){
                 serviceListView.highlight = highlight
                 listFrame.nohighlightlistitem = false;
             }
             serviceListView.currentIndex = index;
             dialService = model.modelData;
             signalSelected()
         }
     }
 }

 Text {
     id: serviceItemInfo
     anchors.top: parent.top
     anchors.left: parent.left
     anchors.topMargin: 5
     anchors.leftMargin: 3
     text: " <b>Service:</b> " + serviceName + "  (" +
                                 majorVersion + "." +
                                 minorVersion + ")"
 }

 Text {
     id: serviceItemInterfaceName
     anchors.top: serviceItemInfo.bottom
     anchors.left: parent.left
     anchors.topMargin: 2
     anchors.leftMargin: 3
     text: " <b>Interface:</b> " + interfaceName;
 }
Another component can be created for highliting a list item:
 Component {
     id: highlight

     Rectangle {
         width: childrenRect.width
         border.color: "black"; border.width: 2
         height: 30
         color : "lightsteelblue"
         gradient: Gradient {
             GradientStop {position: 0.0; color: "steelblue"}
             GradientStop {position: 0.5; color: "lightsteelblue"}
             GradientStop {position: 1.0; color: "steelblue"}
         }
     }
 }
Service signals and function calls on the QML site
In sfw-kinetic-example.qml we define a control named DialScreen and implement the function onDial and onHangup. As you can see in the onDial event we call the service function dialNumber and the onHangup calls hangup. Both function are implemented in the service (see voipdialer header file).
 DialScreen {
     id: dialScreen
     property bool activeCall : false
     property variant currentDialer: 0;
     anchors.topMargin: 5
     anchors.leftMargin: 5
     anchors.rightMargin: 5
     anchors.right: parent.right
     anchors.top: parent.top
     onDial: {
         if (activeCall === false) {
             if (dialerList.dialService != 0) {
                 dialerList.allowselction = false;
                 var o = dialerObject;
                 status.text = "Dialing " + numberToDial +"...";
                 dialScreen.currentDialer = o;
                 o.dialNumber(numberToDial);
                 activeCall = true;
             }
         }
     }
     onHangup: {
         if (activeCall === true) {
             if (dialScreen.currentDialer != 0) {
                 dialScreen.currentDialer.hangup();
             }
             dialerList.allowselction = true;
             status.text = "Hang up";
         }
     }
 }
In DialScreen.qml the dial and the hangup signals are defined. The hangup signal will be emitted if the HangUpButton was clicked:
 DialButton {
     id: hangUpButton
     height: { (numberPad.height / 2) - 2 }
     width: 50
     anchors.top: numberPad.top
     anchors.left: numberPad.right
     anchors.leftMargin: 5
     hoverColor: "red"
     color: "crimson"
     onClicked: {
         dialString = ""
         hangup()
     }
The dial signal will be emitted if the CallButton was clicked:
 DialButton {
     id: callButton
     width: 50
     height: {(numberPad.height/2) -2}
     anchors.top: hangUpButton.bottom
     anchors.left: numberPad.right
     anchors.leftMargin: 5
     anchors.topMargin: 4
     color: "mediumseagreen"
     hoverColor: "lightgreen"
     onClicked: {
         if (dialString != "") {
             dial(dialString)
             dialString = ""
         }
     }
Now we need to connect the stateChanged signal form the services with an event handler on the QML site. This is done in our main declarative file:
 Connections {
     target: dialerObject
     ignoreUnknownSignals: true

     onStateChanged: {
         if (dialScreen.currentDialer.state == 1) {
             status.text += "\nRinging";
         }
         else if (dialScreen.currentDialer.state == 2) {
             status.text += "\nConnected";
         }
         else if (dialScreen.currentDialer.state == 0) {
             status.text += "\nConnection terminated";
             dialScreen.activeCall = false;
             clearStatusTimer.running = true;
         }
         else if (dialScreen.currentDialer.state == 3) {
             status.text += "\nPhone already engaged";
         }
     }
 }
The DialScreen.currentDialer is assigned during a ListView item click in the ServiceList.qml file.