


Flashing in Windows
Note: Make sure that device battery is fully charged before any flashing operations.
To flash your Nokia N950 device, follow these steps:
1. Go to Nokia N9 Developer site and download OneClickFlasher from the link Nokia N950 firmware updates.
2. Double-click the file in the Windows Explorer. The following dialog box opens: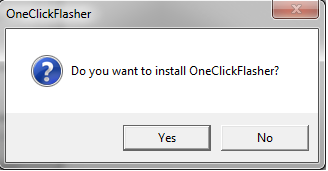
3. Click Yes. OneClickFlasher is installed and starts automatically.
4. Wait until the following text is displayed:
Suitable USB interface (bootloader/phonet) not found, waiting...
5. Ensure that the device is switched off, then connect the device and the host workstation with the USB cable.
6. When you connect the cable, the device displays the text "NOKIA" and switches on automatically.
If Installing Driver Device Software balloon notification appears on the lower right corner of your workstation screen, click the notification. The following dialog box is displayed:
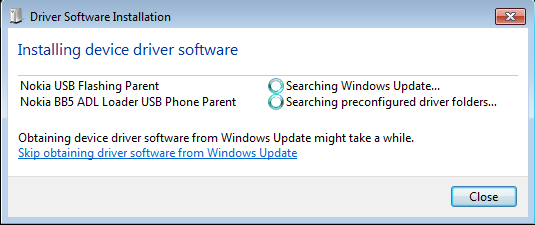
Click immediately Skip obtaining driver software from Windows Update.
Note: You must click the link during the time that the USB icon is displayed on the Harmattan device. If you click the link too late, the device starts to boot and you must start the flashing procedure again from step 5. In that case, you may need to repeat the procedure 1-2 times before the flashing is successful.
7. Wait until the required drivers are installed and the device is flashed. This may take a few minutes. When flashing is complete, the following text is displayed:
Updating SW release
Success
Status: 0
Press Enter to exit & Unplug the USB cable from the device to boot new flashed image...
8. Press Enter on the host workstation keyboard.
9. Disconnect the USB cable. The device boots up and is ready for use. All the installed files are uninstalled from the host workstation.